If you love decorating for fall without spending a fortune, dollar tree stacking pumpkins ideas can turn inexpensive seasonal finds into surprisingly sophisticated autumn decorations. A few lightweight pumpkins, paint, texture, greenery, ribbon, and creative layering can create a stacked pumpkin display that looks much more expensive than the original supplies suggest. 🎃 Instead of simply placing three pumpkins on top of one another, the most stylish projects use thoughtful proportions, coordinated colors, realistic finishes, and decorative details that make the final arrangement feel intentional.
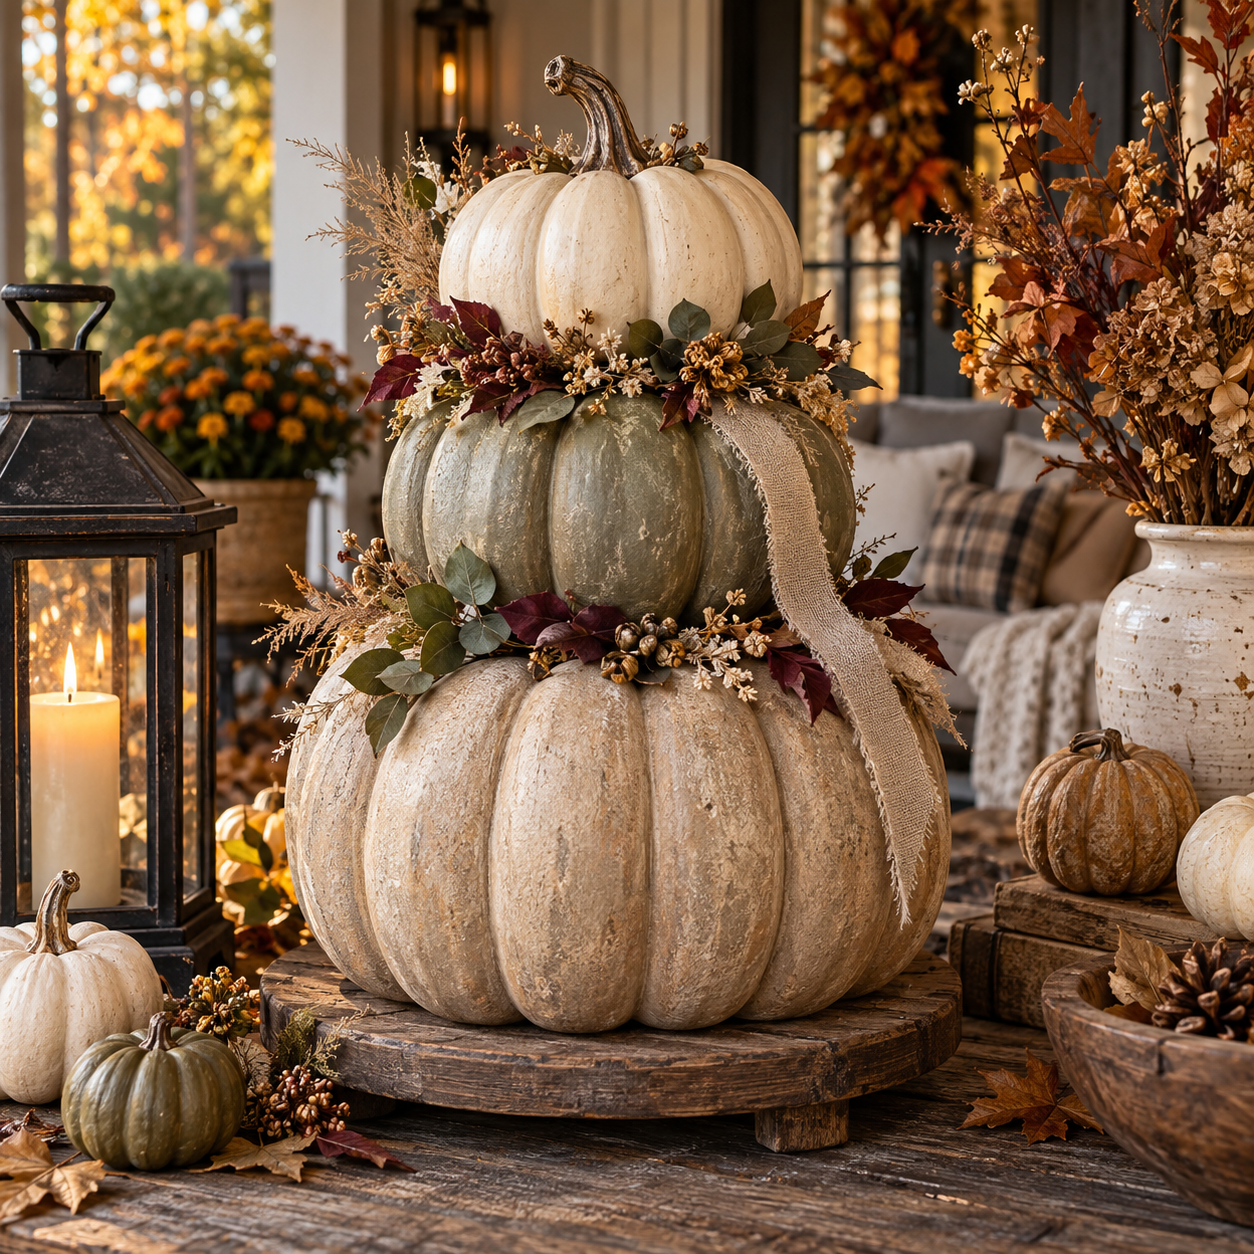
The best part is that stacked pumpkin decorations are extremely flexible. They can work on a front porch, fireplace hearth, console table, dining room sideboard, entryway bench, kitchen counter, or even as a centerpiece. You can make them rustic, modern, romantic, vintage, neutral, dramatic, or colorful depending on the finishes you choose.
For a more elevated result, think beyond bright orange plastic pumpkins. Warm stone finishes, deep botanical colors, aged metallic accents, muted harvest tones, and sculptural silhouettes can transform inexpensive craft pumpkins into decorations that feel custom-made.
Below are three standout approaches that offer completely different looks while remaining affordable and achievable.
Why Dollar Tree Stacking Pumpkins Ideas Are Perfect for Fall
Stacked pumpkin projects have become popular because they create height without requiring a large decorating footprint. Instead of spreading several pumpkins across a shelf or porch, stacking them vertically produces a stronger focal point while leaving space for lanterns, plants, baskets, candles, or other seasonal decorations.
This makes dollar tree stacking pumpkins ideas particularly useful for smaller spaces. A narrow porch corner can suddenly hold an impressive autumn arrangement. A small entryway table can feel professionally styled without becoming overcrowded. Even an empty kitchen corner can be transformed with a compact pumpkin tower.
Another advantage is customization. Dollar-store pumpkins often begin with simple shapes and bold artificial colors, but that simplicity makes them excellent blank canvases. Paint completely changes their personality. Textured finishes can imitate pottery, concrete, plaster, aged stone, wood, or even handcrafted ceramic.
🍂 Neutral colors such as cream, taupe, mushroom, beige, and warm white create an organic modern look.
🌿 Olive, moss, eucalyptus, sage, and forest green create a more botanical atmosphere.
🖤 Charcoal, espresso, burgundy, and bronze can create a moodier upscale fall aesthetic.
Because the materials are inexpensive, experimenting also feels less risky. You can try a new paint treatment, combine unexpected colors, or add embellishments without worrying about ruining an expensive decorative piece.
What Makes Stacked Pumpkins Look Expensive
The difference between a basic craft project and a polished fall decoration often comes down to proportion, texture, color, and restraint.
Start with pumpkins in visibly different sizes. The bottom pumpkin should feel substantial enough to visually support the arrangement. The middle pumpkin should create a smooth transition, while the smallest pumpkin should finish the silhouette without making the tower look top-heavy.
Color matters just as much. Using three completely unrelated colors can make the arrangement feel busy. A better strategy is to work within a controlled palette. For example, ivory, taupe, and caramel create a soft neutral gradient. Moss green, olive, and charcoal create a sophisticated botanical arrangement.
Texture provides another layer of realism. Matte paint usually appears more convincing than shiny craft plastic. Dry-brushed highlights, speckled finishes, plaster effects, or subtle antiquing can help disguise inexpensive surfaces.
Finally, decorations should support the pumpkins rather than overwhelm them. A small ribbon, a few dried leaves, one elegant stem, or a simple wooden tag can make a bigger impact than covering the entire project with embellishments.
Quick Comparison of the Top 3 Styles
| Idea | Best Color Palette | Ideal Location | Overall Style | Difficulty |
|---|---|---|---|---|
| 🥇 Aged Stone Pumpkin Tower | Cream stone taupe mushroom | Porch entryway hearth | Organic luxury | Easy to Moderate |
| 🥈 Harvest Botanical Pumpkin Stack | Olive caramel burgundy muted orange | Console porch dining room | Rich natural autumn | Moderate |
| 🥉 Vintage Cottage Pumpkin Topiary | Warm white dusty sage faded terracotta | Kitchen entryway covered porch | Romantic vintage | Easy |
Each of these approaches starts with affordable materials but creates a completely different visual personality.
🥇 Top 1 Aged Stone Dollar Tree Stacking Pumpkins Ideas
The first design is perfect for anyone who loves neutral fall decorating, organic modern interiors, European-inspired décor, or elegant seasonal decorations that avoid overly bright orange tones.
Instead of making the pumpkins look painted, the goal is to make them appear as though they were carved from weathered limestone or handcrafted from aged ceramic.
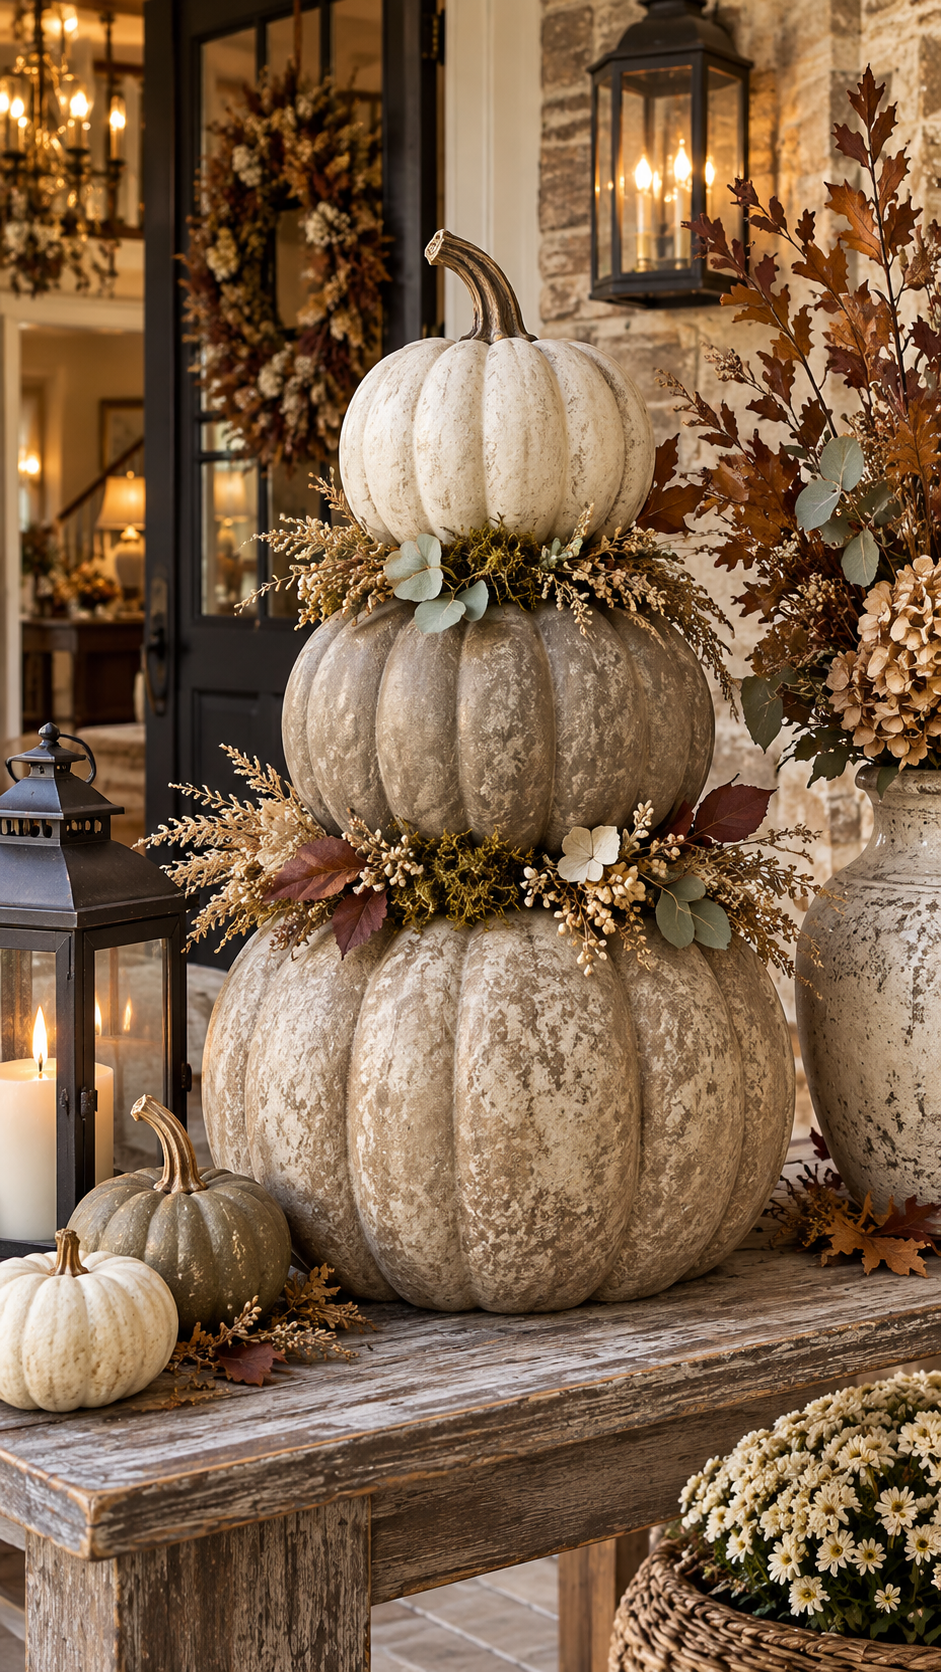
Imagine three pumpkins stacked vertically in slightly different neutral shades. The largest pumpkin has a soft limestone-beige finish. The middle pumpkin is warm mushroom taupe. The top pumpkin is creamy ivory. Subtle variations in texture make each pumpkin appear naturally aged instead of perfectly manufactured.
This style works beautifully because it relies on shape and texture rather than busy decorations.
Choosing the Pumpkins
Look for three lightweight pumpkins in graduated sizes. They do not necessarily need to match perfectly. In fact, slightly different rib patterns can make the finished tower more interesting.
The largest pumpkin creates the visual foundation, so choose one that feels wide and sturdy. The middle pumpkin should be noticeably smaller, while the top pumpkin can be compact and slightly more decorative.
If your pumpkins have bright plastic stems, remove them if possible. Replacing artificial stems with small pieces of natural branch immediately improves the appearance.
A short piece of dried grapevine, fallen tree branch, or unfinished wood can create a convincing pumpkin stem.
Creating the Aged Stone Finish
A flat or chalk-style paint works especially well for this look because it eliminates plastic shine.
Begin with a warm neutral base such as creamy beige, limestone, warm white, or mushroom. Avoid using pure bright white because it can look too clean and artificial.
After the base coat dries, lightly dab a slightly darker shade into the grooves of the pumpkin. The goal is not to create obvious stripes. Instead, create natural-looking shadows that emphasize the form.
Then add a very light dry brush of cream or pale beige across the raised sections.
This combination produces subtle dimension.
For additional texture, mix a small amount of baking soda with paint before applying one of the coats. This creates a slightly gritty finish similar to handmade pottery or stone.
Do not make every pumpkin identical. One could be slightly darker while another could have more visible texture.
That imperfect consistency helps create a collected designer look.
Building the Pumpkin Tower
Before using adhesive, experiment with the arrangement.
Place the largest pumpkin at the bottom and rotate it until the most attractive side faces forward. Position the middle pumpkin slightly off-center rather than perfectly symmetrical. Then angle the smallest pumpkin in the opposite direction.
This tiny change makes the finished arrangement feel more natural and sculptural.
Once you are satisfied with the composition, secure the pumpkins together.
For indoor projects, strong craft adhesive or hot glue may be sufficient. Outdoor decorations should be reinforced more carefully because wind and changing temperatures can weaken simple adhesive connections.
Important Note: If the stacked pumpkins will be displayed outdoors, secure the structure firmly and protect lightweight materials from strong wind, rain, and heat. Decorative craft pumpkins can shift or separate outdoors if they are attached only with small amounts of hot glue.
Styling the Finished Stone Pumpkin Stack
The beauty of this project comes from restraint.
Instead of wrapping the entire tower in ribbon, add only a few decorative accents between the pumpkin layers. Small pieces of preserved moss, dried eucalyptus, wheat stems, or muted leaves can soften the transitions.
🍂 Try placing the tower inside a shallow vintage-style urn.
🏺 A weathered ceramic pot can make the arrangement feel architectural.
🪵 A reclaimed wood stool can create height near a front door.
For a modern porch, combine the stacked pumpkins with black lanterns, oversized planters, and simple grasses.
For an indoor display, place the tower on a console table alongside a ceramic lamp, a wooden bowl, and one branch of autumn foliage.
This is one of the easiest ways to make Dollar Tree pumpkins look dramatically more expensive.
🥈 Top 2 Botanical Harvest Dollar Tree Stacking Pumpkins Ideas
The second approach is richer, warmer, and more traditional—but it still avoids looking overly rustic or overly crafty.
This version combines deep botanical colors with harvest-inspired textures.
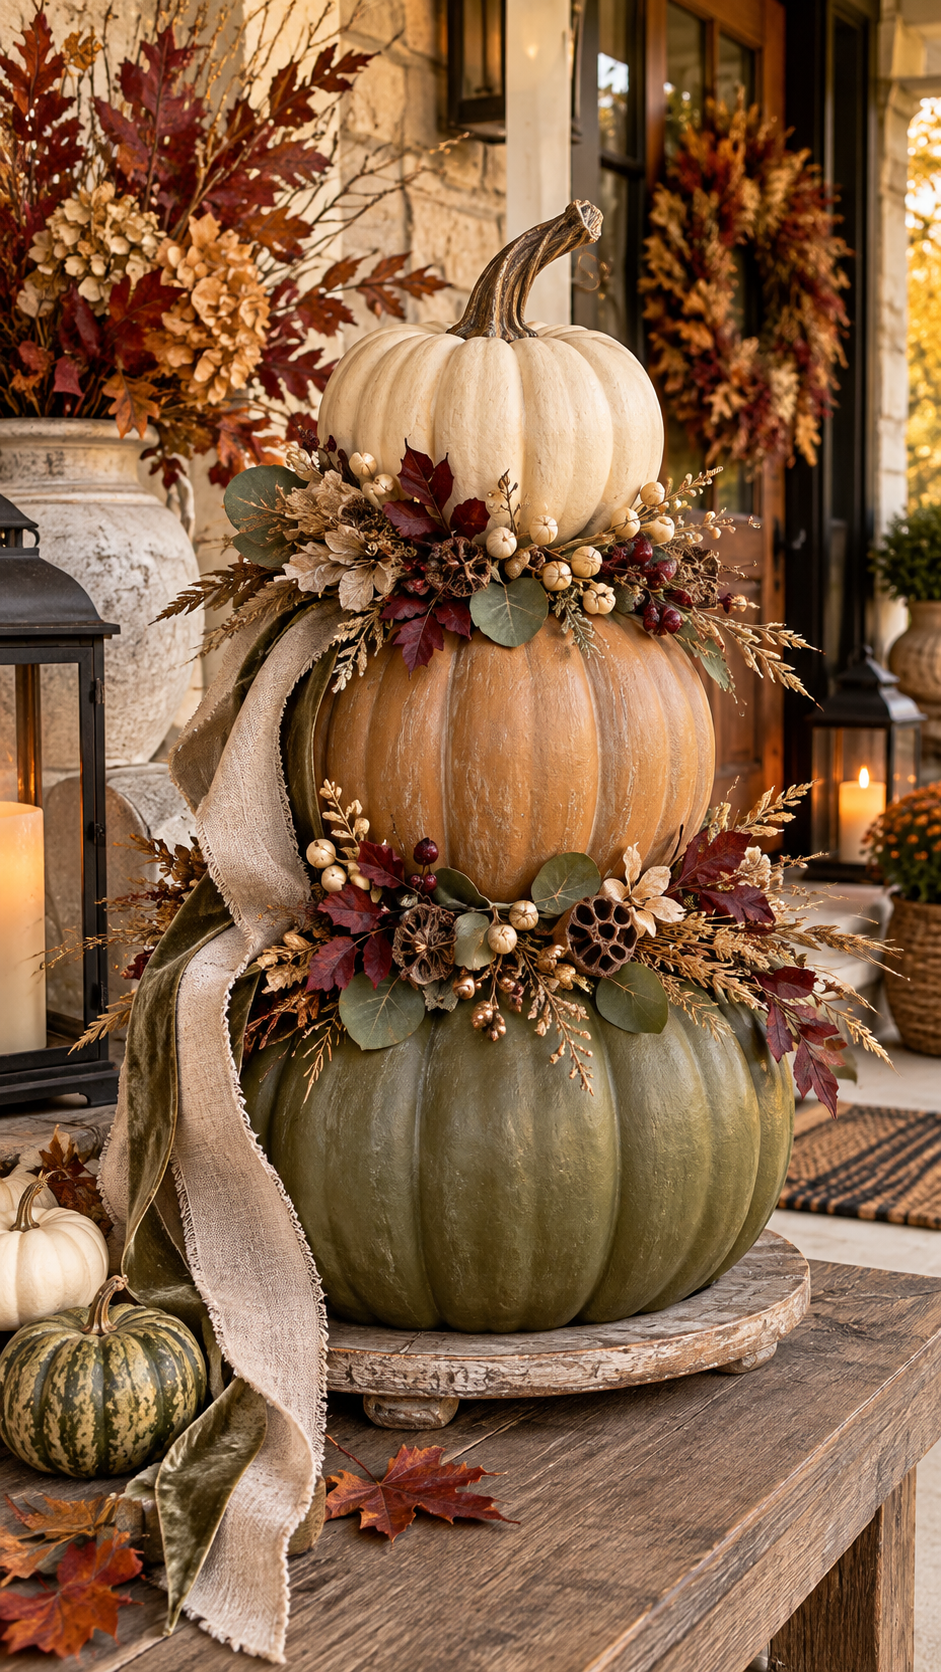
Imagine a large olive-green pumpkin at the bottom, a muted caramel pumpkin in the center, and a creamy pumpkin on top. Between the layers are dried leaves, berry stems, small seed pods, and touches of antique gold.
The result feels like an elegant autumn garden translated into seasonal décor.
Choosing a Sophisticated Harvest Palette
Bright orange is not the only fall color.
One of the easiest ways to elevate inexpensive pumpkin decorations is to use more complex colors.
Consider combinations such as:
- olive green and caramel
- burgundy and muted peach
- moss green and warm cream
- espresso brown and antique gold
- dusty terracotta and beige
- plum and warm taupe
These colors feel seasonal without being predictable.
The bottom pumpkin can carry the darkest color because darker tones create visual weight. Use a slightly lighter color in the center and finish with the lightest pumpkin on top.
This creates a natural gradient that guides the eye upward.
Adding Botanical Details
Botanical details should look as though they naturally gathered between the pumpkins rather than being attached randomly.
Use small dried or artificial pieces rather than large floral bouquets.
Good options include eucalyptus, mini fern stems, wheat, berry branches, dried grasses, acorn picks, seed pods, tiny pinecones, and faded maple leaves.
Place these details where one pumpkin meets another.
This disguises the connection points while adding depth.
🌿 Keep the foliage asymmetrical.
One side can have a slightly larger botanical cluster, while the opposite side remains simpler. Professional floral styling often relies on visual balance rather than perfect symmetry.
You could also introduce one small velvet ribbon or torn linen ribbon near the upper portion of the tower.
Choose earthy colors such as tobacco brown, burgundy, olive, or champagne.
Creating a Subtle Metallic Detail
Metallic accents can make inexpensive seasonal decorations look more refined when used sparingly.
Instead of painting an entire pumpkin gold, lightly brush antique gold paint onto only the stem or a few raised edges.
Another option is to add a tiny metallic leaf charm or aged brass tag.
The shine should be subtle enough that it catches the light without becoming the dominant element.
This technique works especially well with dark olive, burgundy, espresso, and cream.
Making the Design Feel Natural
Avoid placing identical decorations at every level.
If every pumpkin has the same ribbon, leaves, berries, and bow, the stack can begin to resemble a mass-produced holiday decoration.
Instead, vary the details.
The bottom layer might have moss and leaves.
The middle section could have one small berry branch.
The top could feature only a beautiful natural-looking stem and a loose ribbon.
This creates movement while keeping the tower cohesive.
Best Places to Display the Botanical Version
This design works especially well in transitional spaces where outdoor and indoor styles overlap.
Place it near the front door with baskets and lanterns.
Use it beside a staircase with a few scattered pumpkins at floor level.
Position it on a dining room buffet beside tall candlesticks and a vase of branches.
It can also become the centerpiece of an autumn entryway.
For a more editorial look, surround the pumpkin tower with fewer but larger accessories rather than many tiny decorations.
A substantial ceramic vase, a woven basket, and one lantern often look more expensive than ten small seasonal accessories.
🥉 Top 3 Vintage Cottage Dollar Tree Stacking Pumpkins Ideas
The third concept brings softer character into the project.
This style is ideal for cottage-inspired interiors, vintage kitchens, farmhouse spaces, romantic fall decorating, and anyone who prefers seasonal decorations with a handmade collected feeling.
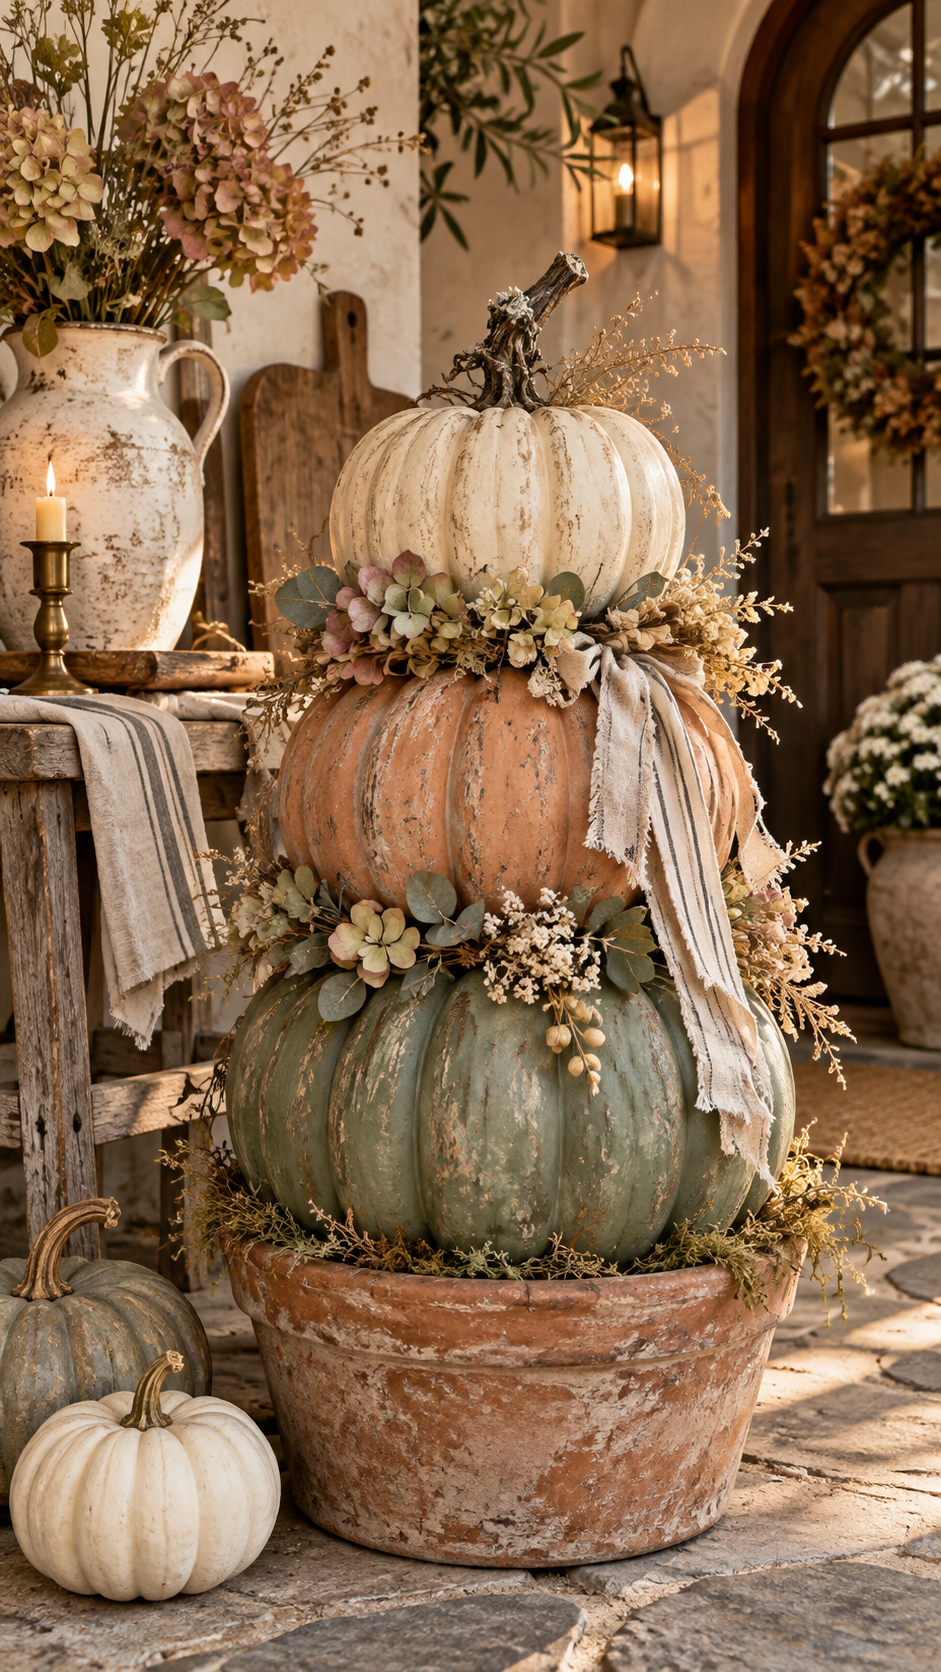
Instead of stone textures or dramatic harvest colors, this version uses faded paint, subtle distressing, soft floral details, and vintage-inspired accessories.
The result feels charming without becoming overly rustic.
Choosing Soft Cottage Colors
Start with a muted palette.
Warm white is a beautiful base, but combine it with softer supporting colors such as dusty sage, faded terracotta, pale mustard, antique cream, muted peach, or weathered blue-gray.
One attractive combination uses a sage-green pumpkin on the bottom, faded cream in the middle, and warm white on top.
Another version could combine terracotta, pale peach, and ivory.
The important detail is keeping the colors slightly desaturated.
Extremely bright colors can weaken the vintage effect.
Creating a Timeworn Paint Effect
The goal is to create gentle age rather than heavy distressing.
Paint the pumpkin in your chosen base color and allow it to dry completely.
Then use a dry brush with a lighter shade across the raised ribs.
For slightly more character, gently add a warm brown or taupe wash to the deeper grooves.
Immediately wipe away the excess.
This leaves a small amount of darker pigment in the recessed areas, emphasizing the pumpkin’s shape.
You can also sand a few raised sections very lightly if the underlying material creates an attractive contrast.
The effect should remain subtle.
Think old painted furniture rather than heavily distressed craft décor.
Adding Vintage Inspired Details
This is where the cottage version becomes especially charming.
Instead of bold wired ribbon, consider narrow velvet ribbon, torn linen, faded gingham, cotton tape, lace, or soft ticking stripe fabric.
Use these materials in small amounts.
A narrow ribbon tied loosely beneath the top pumpkin may be enough.
Tiny faux flowers can also work beautifully. Choose muted varieties that resemble dried wildflowers rather than bright spring florals.
Dried hydrangea-style petals, tiny cream blossoms, dusty pink flowers, or muted greenery can complement the aged finish.
An old-fashioned label or miniature wooden tag can add another layer of detail.
For a kitchen display, a handwritten-style tag with a simple autumn word such as Harvest or October can add personality.
Use a Vintage Container as the Base
Instead of placing the pumpkin tower directly on a table, use an interesting container.
A galvanized bucket creates a relaxed farmhouse feel.
A weathered clay pot creates a European cottage effect.
An enamel bowl can make the piece suitable for a kitchen.
A small wooden crate works beautifully on a covered porch.
For an especially charming display, add shredded paper, moss, or natural excelsior around the bottom of the pumpkin tower so it feels nestled into the container.
This simple technique also helps hide gaps.
Add Surrounding Decorations Carefully
Because the pumpkin stack is already decorative, surrounding accessories should remain secondary.
A vintage cutting board behind the display can add warmth.
A small lamp can create cozy light.
One ceramic pitcher filled with dried stems can extend the seasonal color palette.
A folded linen towel adds softness in a kitchen or dining area.
The trick is creating a layered scene without losing the stacked pumpkins as the focal point.
How to Choose the Right Pumpkin Stack for Your Home
All three ideas can look beautiful, but each works best with a slightly different decorating style.
Choose the aged stone pumpkin tower if your home features modern organic furniture, neutral colors, natural wood, limestone, linen, minimalist accessories, or contemporary farmhouse elements.
Choose the botanical harvest stack if you prefer richer fall colors, natural foliage, elegant seasonal styling, traditional interiors, or dramatic autumn displays.
Choose the vintage cottage stack if your style includes antique furniture, soft colors, floral details, rustic kitchens, cottage décor, flea-market finds, or nostalgic accessories.
You can also combine elements from different designs.
For example, use the stone finish from the first project but incorporate deep burgundy foliage from the second.
Or use cottage-style faded paint with a sophisticated ceramic urn instead of a galvanized bucket.
The strongest DIY projects often mix ideas rather than following one style literally.
How to Make Dollar Tree Stacking Pumpkins Ideas Look Less Crafty
Budget decorating does not need to look inexpensive.
One of the biggest mistakes is adding too many embellishments simply because they are available.
A pumpkin tower covered with bows, leaves, signs, glitter, flowers, berries, and decorative picks can quickly lose its shape.
Instead, choose one or two focal details.
🎃 Let the pumpkins provide the main shape.
🌿 Let greenery provide movement.
🎀 Let ribbon create softness.
✨ Let metallic details provide just a small highlight.
Another helpful trick is to repeat materials already found in your room.
If your home contains black metal lighting, introduce a black or charcoal detail into the pumpkin display.
If your space contains natural oak furniture, use wooden stems or a wood base.
If your room uses brass hardware, add a tiny touch of antique gold.
These repeated materials help the DIY project visually belong in the space.
Choosing the Best Base for Stacked Pumpkin Decorations
A strong base can completely change the finished design.
For porch decorating, consider large terracotta pots, cement-style urns, wooden crates, baskets, or simple outdoor planters.
For indoor decorating, pedestal bowls, cake stands, wooden risers, ceramic pots, shallow baskets, and vintage bowls can work beautifully.
The base should generally be slightly wider than the bottom pumpkin.
If the base is too small, the tower may feel unstable.
If it is dramatically larger, the pumpkins can look lost.
Proportion is key.
Adding a small amount of moss, leaves, straw, or fabric around the base can help visually connect the pumpkin arrangement to its container.
Where to Display Stacked Pumpkins
A tall pumpkin arrangement naturally attracts attention, so place it where you want to create a focal point.
The front porch is one of the most obvious locations. Position the stack beside the door and balance it with a lantern or planter on the opposite side.
For an asymmetrical porch arrangement, place the pumpkin tower on one side only and group several loose pumpkins around its base.
An entryway table is another excellent location.
Place the pumpkin tower on one side of the console and balance it with a lamp or tall vase on the opposite side.
On a fireplace hearth, two different-height pumpkin towers can frame the space without requiring identical decorations.
In a dining room, a smaller stacked pumpkin arrangement can sit on a sideboard instead of the dining table, leaving the table free for meals.
Even a kitchen island can hold a mini version using small pumpkins.
Simple Supplies That Can Create a Designer Finish
You do not need a complicated craft collection to make these projects attractive.
A carefully selected group of basic materials is usually enough.
Useful supplies can include:
- three graduated craft pumpkins
- matte or chalk-style paint
- small paintbrushes
- craft adhesive
- natural branches for stems
- dried or artificial greenery
- linen or velvet ribbon
- preserved moss
- metallic craft paint
- a decorative pot or bowl
- optional texture medium
You may already have several of these materials at home.
Leftover wall paint can work beautifully on craft pumpkins, particularly when it has a matte or eggshell finish.
Small fabric scraps can become ribbon.
Branches from the yard can become stems.
Old pots can be refreshed with paint and reused as bases.
These details can reduce the cost even further.
Creating a Cohesive Fall Decorating Story
A stacked pumpkin project becomes more effective when it connects with the rest of your seasonal decorations.
If your pumpkin tower uses olive green, repeat olive in a nearby pillow, throw blanket, plant, or vase.
If the arrangement includes burgundy, introduce a small amount of burgundy foliage elsewhere in the room.
If the pumpkins have a limestone finish, incorporate similarly colored ceramics.
Repeating one or two colors around the room makes the entire seasonal display feel coordinated.
You do not need matching decorations everywhere.
Instead, think about visual rhythm.
A cream pumpkin on the console can connect with cream candles on the coffee table.
A walnut-colored pumpkin stem can relate to wooden furniture.
A brass accent can echo nearby cabinet hardware.
These subtle repetitions create a more polished appearance.
Final Thoughts on the Best Dollar Tree Stacking Pumpkins Ideas
The most successful dollar tree stacking pumpkins ideas prove that seasonal decorating is less about how much an item costs and more about how it is transformed and styled.
🥇 The Aged Stone Pumpkin Tower is the strongest choice for a sophisticated neutral home. Its limestone-inspired texture, muted palette, and sculptural silhouette create an elegant decoration that can blend naturally with high-end organic modern interiors.
🥈 The Botanical Harvest Pumpkin Stack offers more color and seasonal drama. Olive, caramel, burgundy, dried foliage, and subtle metallic accents create a rich autumn display that feels warm without relying on traditional bright-orange décor.
🥉 The Vintage Cottage Pumpkin Topiary brings a softer nostalgic personality with faded paint, natural stems, subtle floral accents, and vintage-inspired containers.
Whichever direction you choose, focus on proportion first, color second, and embellishments last. Starting with a strong pumpkin silhouette makes the project attractive before any greenery, ribbons, signs, or decorative details are added.
The most expensive-looking version is rarely the one with the most decorations. It is usually the arrangement with the most intentional choices.
Use matte textures instead of shiny plastic surfaces. Work with a limited palette. Replace artificial stems whenever possible. Keep embellishments concentrated around natural transition points. Give the finished piece enough empty space around it so it can become the visual focal point.
With those simple principles, a few affordable pumpkins can become a beautiful fall decoration that feels custom, stylish, and far more luxurious than its original price suggests. 🎃🍂
Related posts:

Top 3 Fall Bathroom Decor Ideas That Make Your Space Look Expensive
Top 3 Fall Dough Bowl Ideas That Make Your Home Look Effortlessly Cozy
Top 3 Fall Office Decor Ideas That Make Your Workspace Look Instantly More Expensive
Top 3 Fall Bedding Combo Ideas That Make Any Bedroom Look Expensive
Top 3 Fall Fireplace Mantel Decorating Ideas That Make Your Living Room Look Expensive
Top 3 Fall Planter Ideas That Will Make Your Porch Look Expensive This Season