
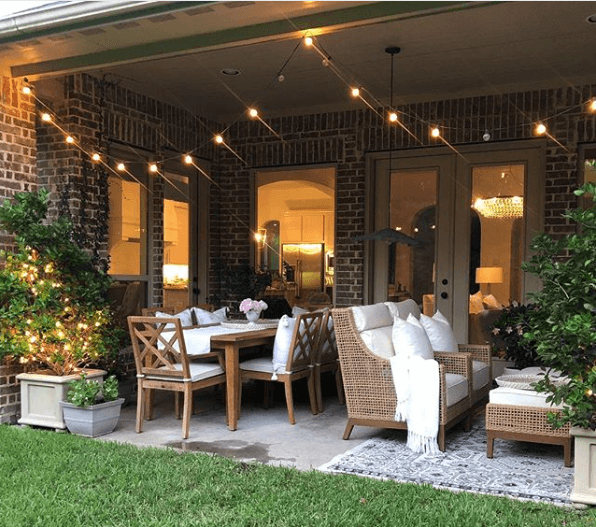
Your patio can be attractive enough during the day but it turns into a vacant dark space without proper lighting during the night. While adding usual light is nice, hanging patio lights is way more interesting. In fact, if you do it properly, it makes your patio ready for a party venue.
Read also: BEST PATIO UMBRELLA WITH SOLAR LIGHTS
How to Hang Patio Light
There are actually several options when it comes to hanging the patio lights. The variation depends on many factors including where you want to hang it, the types of the light and more. However, you can always follow the basic steps below.
1. The Supplies
You are going to need the following stuffs so make sure to make them ready before installation:
- Guy wire kit
- Extension cords
- Carabiners
- Zip ties
- Hooks
2. The Steps
When the supplies are ready, you can begin following these steps:
- Sketch your plan and complete it with exact measurement.
- If it is applicable, assemble the poles you are going to use.
- If you use the guy wire, you need to hang this wire first.
This totally depends on your circumstances, but string lights commonly need to be threaded through this wire as well. Of course, not all lights should be treated the same way, so do as you see fit with the lights and wire.
As additional information, string lights will get more and more tension as it hangs there over time, and guy wire will help in reducing it.
- Set a male plug very near to your electrical outlet, and then hang the first string.
- Set the string using the hooks or zip ties.
The best position for these hooks is between the bulbs. Set the hook on your guy wire if possible as well as on your patio railing.
- When the first string is set right and you want to hang more strings, let’s begin hanging the second one.
Connect the male plug of the second string to the female plug at the end of the first string. Then, repeat the previous step. Continue until you hang all the strings you want to hang.
Make sure to check on the outlet maximum wattage. If it isn’t sufficient, you should consider connect a few strings on the other outlet to prevent disruptions.
- Give a last check on your strings, and then plug it in.
Now you can enjoy a new ambience on your patio. If you hang enough lights on the right way, this will brighten the space without being too bright. You will love your patio new look.
Where Should We Hang Patio Lights

There are many options of place where you can hang the patio lights. It entirely depends on your preference and the final look you are targeting. However, these four options are the most popular:
1. Pergola or Gazebo Outlining
This is actually a great idea. The pergola or gazebo can be a highlight if you don’t have the regular style of patio. Outlining the gazebo will add a center point on the space and add some lighting on your patio.
2. Deck Railings
Deck railing allows you to thread the strings on it. While it gives enough lighting to your patio, it is actually quite practical too. You don’t need to build some poles or attach too many hooks. Do it vertically and horizontally for an ultimate result.
3. Trees
If there are trees near your patio, it will make decent replacement for poles. Simply wrap the tree with the string light and it will change your patio look in an instant. Make sure to give enough string to get to the outlet nearby.
4. Across the Deck or Backyard
This is also a popular setup for a patio, as well as for an outdoor party. Basically, you will hang the string light from your patio out across to the end or middle of your backyard. If you don’t have anything to hang it on to across, you may need some poles.
Planning to Hang Patio Lights
Hanging patio light is always a fun alternative to the conventional setup. While it looks way better, it actually brightens the entire part of your patio effortlessly once you get it right. So how can we make it right? You need a proper planning, and it can be done as follow:

1. Get Your Space Measurement
Knowing your space dimension will be the first priority. For the best reference later when you are setting up, draw your own sketch of the space where you want the patio lights are. Add the measurements on the sketch too. This measurement will be very crucial to define the length of string lights you will need.
On the sketch make sure to actually include the best appeal of your patio so it gets highlighted as you add the light.
2. Decide on Your Hanging Pattern
You can decide on a pattern by taking inspiration from places like restaurants, event and party spaces, as well as public squares. According to the pros, there are four most popular and most appealing patterns you can try:
a. Grid or Square
This pattern is actually the simplest one. It outlines the space you targeted in a simple square shape. It can be a perimeter as well if you want to and it doesn’t require too complicated setup as well. Make sure the lights are bright enough if your patio space is large.
b. Zig Zag
This pattern makes sure that you can brighten the entire of your patio space while adding fun setting of the light as well. You can create this pattern with one long string of lights, or using a few of them by connecting them end to end.
c. Horizon
This pattern basically needs a few strings of light which comes from one central point. They then fan out to its each pole, giving illumination to your entire patio space. It allows you to make it easier to place the centerpoint as well later.
d. Maypole
It adopts the tent style. You will need on central point in the middle of the space, and then each string will fan out creating circular shape around the center. You may need to hire a pro for this setup.
Hanging patio lights is actually a lot of fun especially when you see the final result. Make your plan first and then hang the lights properly for the best result.


