
Creating memorable diy outdoor halloween decorations does not require a huge budget, professional props, or a yard filled with store-bought plastic décor. Some of the most impressive Halloween displays are built from simple materials such as cardboard, branches, old containers, fabric, inexpensive lights, weathered wood, and recycled household items. The secret is not necessarily how much decoration you use, but how carefully you build the atmosphere around a few strong visual ideas.
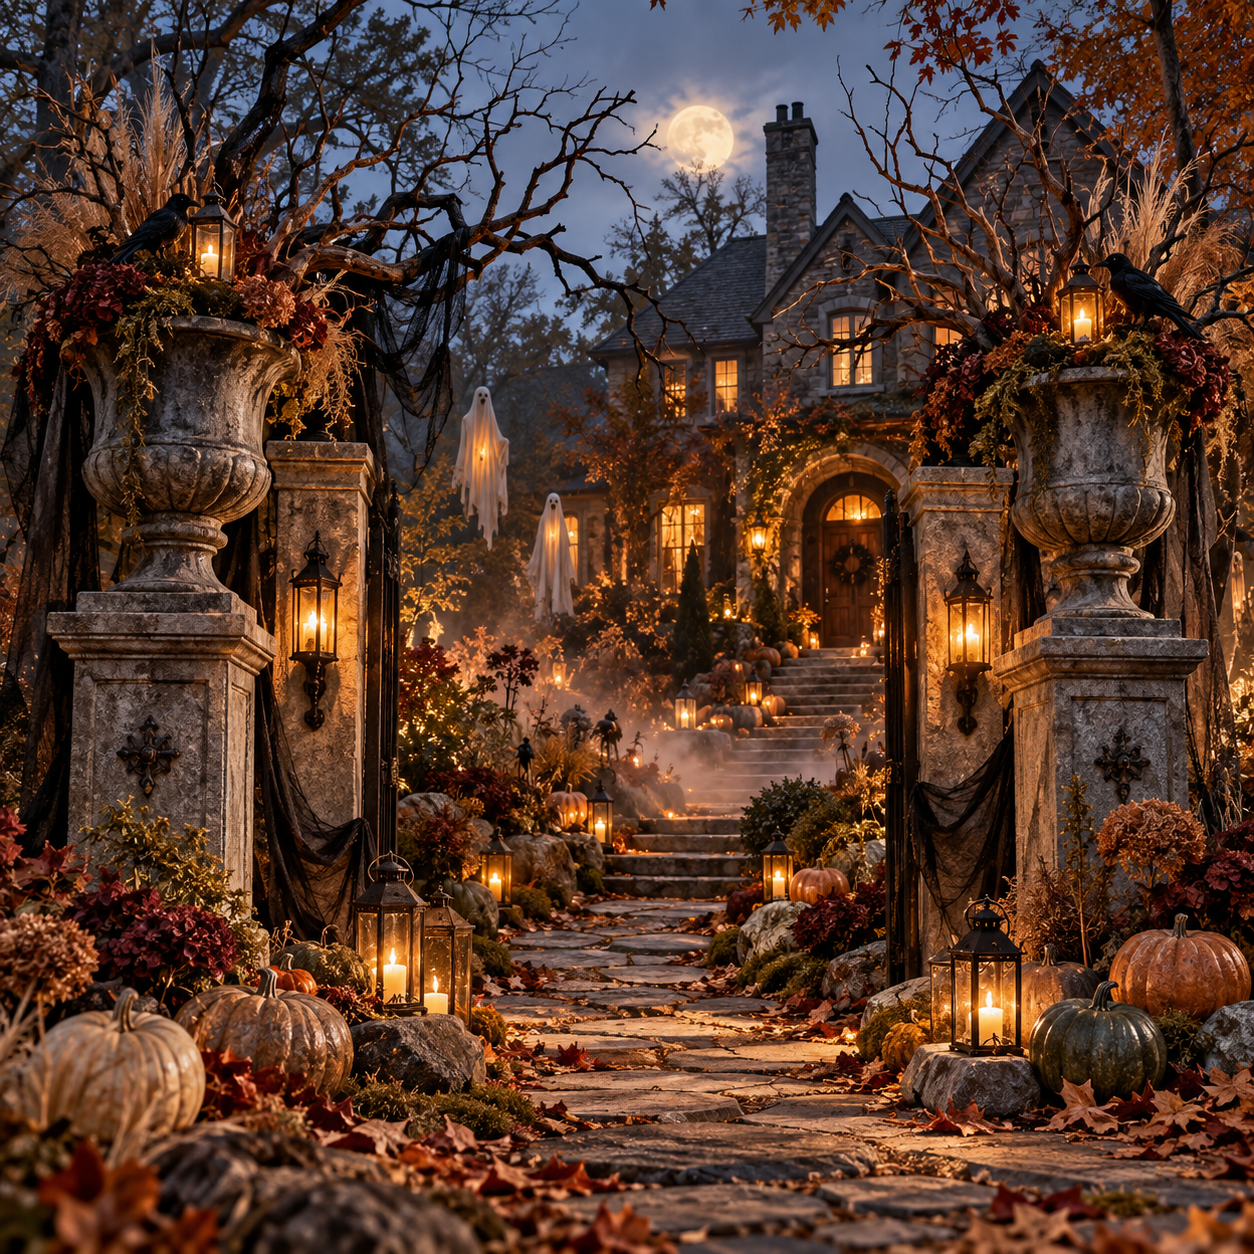
A well-designed outdoor Halloween display should immediately tell a story. Instead of scattering pumpkins, skeletons, signs, ghosts, and spiderwebs randomly across the yard, it is much more effective to create one clear theme and repeat its colors, materials, and shapes throughout the space. This approach makes even inexpensive DIY projects feel intentional and visually expensive.
🎃 The best Halloween yards usually combine three elements: a dramatic focal point, a clear walking path or visual direction, and atmospheric lighting. When these pieces work together, a simple front yard can suddenly feel like a haunted estate, mysterious woodland, or abandoned Gothic property.
The following Top 3 DIY Outdoor Halloween Decorations focus on those principles. Each idea is designed to be achievable with affordable materials while still producing a dramatic Pinterest-worthy result that looks impressive both during the day and after sunset.
Why DIY Outdoor Halloween Decorations Can Look Better Than Store Bought Decor
One of the biggest advantages of making Halloween decorations yourself is control over scale. Many inexpensive store-bought Halloween decorations are relatively small, which means they can disappear visually when placed in a large outdoor space. A handmade decoration can be designed specifically for your porch, walkway, lawn, gate, or garden bed.
Large-scale decorations do not necessarily require expensive materials either. Foam board, cardboard tubes, scrap wood, old buckets, tree branches, fabric, and recycled packaging can all become surprisingly convincing Halloween props when painted and styled carefully.
Another advantage of diy outdoor halloween decorations is that the finished display can look more original. Popular commercial decorations often appear in thousands of yards every October. Handmade features give the space more personality because they can be adjusted to match the architecture of the house and the shape of the landscape.
A dark brick house, for example, may look incredible with a Gothic graveyard theme, while a cottage-style home might work beautifully with an enchanted haunted woodland. A modern house can even support minimalist black silhouettes, sculptural pumpkins, and dramatic warm lighting.
The most effective DIY Halloween displays also use repetition. Three matching lanterns often look more sophisticated than ten unrelated decorations. A row of oversized ghosts can feel more dramatic than dozens of tiny plastic figures. A repeated palette of black, gray, ivory, rust, and warm amber light can visually connect the entire scene.
Best 3 DIY Outdoor Halloween Decorations At a Glance
The three concepts below are intentionally different so they can work with different home styles and outdoor spaces.
| Idea | Best Location | Main Materials | Difficulty | Overall Effect |
|---|---|---|---|---|
| Haunted Estate Entrance | Porch gate driveway or walkway | Foam board wood lanterns fabric branches | Medium | Dramatic elegant and theatrical |
| Giant Weathered Stone Urns | Porch steps entryway or garden beds | Plastic containers paint foam branches | Easy to Medium | Expensive architectural look |
| Moonlit Haunted Woodland Path | Walkway front yard or side garden | Fallen branches lights fabric moss | Easy | Mysterious immersive and atmospheric |
Each idea can work independently, but they can also be combined. For example, two oversized urns can frame the entrance to a haunted walkway, while branches and lanterns can visually connect the porch to the yard.
🥇 Best 1 DIY Outdoor Halloween Decorations With a Grand Haunted Estate Entrance
A dramatic haunted estate entrance is one of the most effective ways to transform the entire appearance of a house for Halloween.
Instead of covering every part of the property with decorations, concentrate the strongest visual details around the area where guests naturally enter. This could be the front gate, the beginning of the walkway, the porch stairs, or the front door.
The goal is to make the entrance look as though visitors are crossing into an old abandoned property that has been untouched for decades.


Build Tall Haunted Entrance Columns
Tall columns instantly add architectural drama.
These columns do not need to be made from real stone. Lightweight structures can be created using stacked cardboard boxes, rigid foam insulation, shipping cartons, plastic storage containers, or scrap wood.
The proportions matter more than the material.
Make the columns tall enough to feel substantial when viewed from the street. Rectangular shapes generally look more believable than narrow posts because they create the impression of heavy masonry.
Once the basic structure has been assembled, cover visible seams before painting.
A base coat of charcoal gray or muted stone gray works well. After it dries, use a sponge to dab lighter gray across selected areas. A small amount of dark brown or green can imitate dirt, moss, and age.
The finished surface should look irregular rather than perfectly painted.
🕯️ Small imperfections make fake stone more convincing.
You can also carve shallow cracks into foam or paint thin irregular lines across the surface to create the illusion of damaged masonry.
Add a Handmade Haunted Sign
A sign gives the entrance personality and strengthens the story of the display.
Use a reclaimed wood board, inexpensive fence plank, plywood scrap, or thick foam board. Paint it in a weathered finish rather than making it look brand new.
Possible phrases might reference an abandoned manor, haunted garden, cemetery, or mysterious estate.
However, the sign does not need complicated text. Even a simple house number painted in faded lettering can look incredibly atmospheric when surrounded by branches and lanterns.
Mount the sign between the entrance columns or attach it to one side as though it has been hanging there for decades.
Slightly crooked placement often looks more convincing than perfect symmetry.
Frame the Entrance With Twisted Branches
Natural branches are among the best materials available for inexpensive Halloween decorating.
Collect fallen branches rather than cutting healthy trees. Look for pieces with unusual shapes, forks, curves, or smaller branching sections.
Arrange several tall branches behind the entrance columns so they appear to grow around the structure.
Paint some branches matte black if you want a stronger Gothic look, or leave them natural if you prefer a woodland atmosphere.
Artificial spiderwebs can be stretched lightly between the branches, but use them sparingly. Heavy white webbing can easily dominate the display and make it look less sophisticated.
A few subtle strands generally create a more realistic abandoned appearance.
Use Lanterns Instead of Bright Halloween Lights
Lighting can completely change how homemade decorations are perceived.
Bright multicolored lights create a playful Halloween atmosphere, but warm amber lighting usually looks more expensive and cinematic.
Place LED lanterns along the walkway leading toward the entrance.
You can use inexpensive lanterns, recycled jars with battery candles, or simple homemade lantern frames.
Vary the heights.
Some lights can sit directly on the ground while others can rest on steps, crates, tree stumps, or stone blocks.
This uneven arrangement creates more depth and makes the space feel naturally aged.
Important Note: Use battery-operated LED candles or outdoor-rated lighting around dry branches, leaves, fabric, cardboard, and foam. Avoid open flames in DIY Halloween displays because many commonly used decorating materials can ignite easily.
Create a Dramatic Focal Point Beyond the Gate
The entrance becomes more effective if visitors can see something mysterious beyond it.
Place one strong feature deeper into the yard.
This might be an old chair, a large ghost silhouette, a weathered mirror frame, a fake cemetery monument, or a cluster of glowing pumpkins.
Positioning the feature farther from the entrance creates visual depth.
The viewer should feel that the display continues beyond the first decoration.
🌙 Think of the yard like a movie set.
The entrance introduces the scene, the walkway guides the viewer, and the distant focal point gives the eye somewhere to travel.
🥈 Best 2 DIY Outdoor Halloween Decorations With Giant Weathered Stone Urns
Large decorative urns are commonly associated with expensive homes, historic buildings, old cemeteries, and formal gardens.
That makes them perfect for Halloween.
The good news is that convincing oversized Halloween urns can be created from inexpensive household containers.
When positioned beside a doorway or walkway, they can instantly make an outdoor display look more architectural and polished.

Build the Urn Shape From Recycled Containers
Look for containers with useful shapes.
Large plastic flowerpots, buckets, lightweight planters, bowls, nursery pots, and even sturdy waste bins can work.
Combining two or three shapes often produces the best result.
For example, a large planter can form the upper bowl while an upside-down smaller pot becomes the base.
Attach the pieces securely using an adhesive suitable for the materials being used.
The final structure does not need to look perfect before painting.
Once everything receives the same textured finish, separate components visually blend together.
Create a Faux Aged Stone Finish
Paint is what transforms inexpensive plastic into something that resembles stone.
Begin with a dark gray base coat.
Once dry, apply medium gray using a sponge or dry brush. Concentrate the lighter paint on raised surfaces while leaving darker areas visible inside grooves and around the base.
Finish with small touches of pale gray or dusty beige.
For additional texture, some DIY decorators mix fine sand into the first coat of paint. This creates a subtle rough finish that helps disguise plastic surfaces.
You can also add simulated moss using muted green paint.
Apply it mainly around seams, corners, and lower areas where moisture would naturally collect.
Avoid covering the entire urn in bright green.
The effect should be subtle.
Fill the Urns With Dramatic Branch Arrangements
The contents of the urns are where the Halloween theme becomes obvious.
Use tall bare branches as the main structure.
The branches should extend well above the container so the display feels dramatic from a distance.
Add dried seed heads, ornamental grasses, dark artificial foliage, twigs, dried hydrangeas, or faded autumn leaves.
For a slightly Gothic look, weave narrow strips of black gauze or torn fabric between selected branches.
Allow some fabric to move naturally in the wind.
🖤 Avoid stuffing every empty space.
A few sculptural branches usually look more elegant than a dense arrangement.
Negative space allows the shapes of the branches to remain visible, especially when they are illuminated at night.
Add Hanging Details
Small hanging elements can make the arrangement more interesting.
Mini lanterns, lightweight ravens, tiny skeleton keys, aged tags, or small ghost forms can hang from individual branches.
Keep the scale small compared with the main structure.
These details should reward viewers who look closer rather than becoming the main focus.
If using birds such as ravens or crows, position them naturally.
One bird sitting near the top of a branch can look more convincing than several identical birds placed evenly across the arrangement.
Use the Urns as Symmetrical Entrance Decor
One of the easiest ways to make DIY décor feel expensive is symmetry.
Create two matching urns and place them on opposite sides of the front door, porch stairs, garden gate, or walkway.
The arrangements do not have to be completely identical.
The containers and overall height should match, but the direction of the branches can vary slightly.
This balance makes the display feel designed rather than random.
Add pumpkins around the base to visually connect the urns with the surrounding autumn landscape.
Choose pumpkins in muted shades such as cream, dusty orange, dark green, soft gray, or deep rust for a more sophisticated appearance.
Add Hidden Lighting Inside the Branches
Tiny warm LED lights can transform the urns after sunset.
Instead of wrapping every branch like a Christmas tree, place lights deeper inside the arrangement.
This creates small points of light that appear to glow from within.
You can also place an uplight or weather-safe spotlight behind the urn.
The branches will cast dramatic shadows across the porch wall.
Those moving shadows can become part of the decoration themselves.
🥉 Best 3 DIY Outdoor Halloween Decorations With a Moonlit Haunted Woodland Path
A haunted woodland path is one of the easiest outdoor Halloween ideas to create because nature already provides many of the materials.
Branches, leaves, stones, tree trunks, garden beds, and existing plants can all become part of the scene.
Instead of trying to hide the landscape, this idea uses it.
The goal is to transform a normal walkway into a mysterious path that feels as though it leads through an enchanted or abandoned forest.

Start With the Existing Walkway
You do not need a large garden.
A simple walkway from the driveway to the porch can become the foundation of the entire design.
Begin by visually defining the edges.
Place groups of branches, stones, pumpkins, lanterns, or dried plants along both sides.
Avoid perfectly even spacing.
Natural environments rarely repeat at exact intervals.
Create small clusters instead.
One area might contain three pumpkins, another a lantern and branch, while another could feature a pile of leaves and stones.
The irregular rhythm makes the pathway feel more organic.
Create Branch Arches Over the Path
Branch arches can instantly transform an ordinary walkway.
Use long lightweight branches positioned on opposite sides of the path.
Lean them inward slightly so they visually meet overhead.
They do not necessarily need to touch.
Secure branches carefully to stakes, railings, garden structures, or weighted containers.
The goal is to create the impression that twisted trees are growing toward each other.
Add a small amount of Spanish moss, dark fabric, vines, or thin artificial webbing.
Again, restraint is important.
Too much material can hide the beautiful natural branch shapes.
Make Simple Floating Ghosts
Floating ghosts are an easy way to add movement to the woodland scene.
Use lightweight white or gray fabric draped over a simple round form.
The shape can be created from foam balls, lightweight bowls, or crumpled paper covered securely with weather-resistant material.
Suspend the ghosts from tree branches or hidden support lines.
Leave the lower fabric loose enough to move slightly in the wind.
For a more sophisticated look, avoid cartoon faces.
A faceless translucent figure can actually feel more mysterious because it relies on silhouette rather than expression.
Position some ghosts farther back in the garden.
Distance makes them appear more subtle and unexpected.
Add Ground Level Fog Effects Without Overcrowding
Fog can enhance the atmosphere of a woodland Halloween display, especially around the path.
If using a fog machine, keep the effect concentrated near the ground.
The purpose is to soften the landscape rather than completely hide it.
Even without a fog machine, a similar visual effect can be suggested by using pale gray fabric or wispy decorative material tucked around rocks and branches.
Lighting from behind can make these materials glow slightly after dark.
The effect should remain secondary to the pathway.
Build DIY Woodland Lanterns
Lanterns help visitors understand where to walk while also strengthening the Halloween atmosphere.
Simple lanterns can be made using glass jars, metal cans with punched holes, old containers, or inexpensive wooden frames.
Place battery candles inside.
Warm amber light usually works best with this theme because it resembles candlelight.
Position lanterns at different heights.
Some can sit among fallen leaves while others can hang from shepherd hooks or branches.
Place the brightest lanterns near changes in elevation such as steps.
This makes the path both decorative and easier to navigate.
Hide Small Halloween Details Along the Route
One reason haunted woodland displays are fun is that visitors can discover details gradually.
A small skull might sit partially hidden beneath leaves.
A raven could appear on a branch.
A forgotten lantern might glow beside a tree trunk.
A weathered sign could point toward an imaginary cemetery.
These small elements create visual storytelling.
Instead of revealing everything from the street, the display becomes more interesting as visitors move closer.
👻 The most memorable Halloween decorations often create discovery rather than simply displaying objects.
How to Make DIY Outdoor Halloween Decorations Look Expensive
Regardless of which idea you choose, several design principles can dramatically improve the finished result.
The first is scale.
Outdoor decorations generally need to be larger than indoor decorations because they are viewed from greater distances.
Instead of making ten small props, consider making three large ones.
Large silhouettes are much easier to see from the sidewalk or road.
The second principle is color consistency.
Choose a limited palette and repeat it.
For example, you might use charcoal black, stone gray, aged brown, ivory, muted orange, and warm amber lighting.
When every object belongs to the same palette, even inexpensive materials appear more coordinated.
Texture also matters.
Weathered wood, rough stone finishes, wrinkled fabric, dried leaves, natural branches, aged metal, and matte surfaces usually photograph better than shiny plastic.
If a plastic decoration looks too new, repainting it with a matte or weathered finish can completely change its appearance.
Use Layers Instead of Filling Every Space
One of the biggest mistakes in outdoor Halloween decorating is trying to cover every available surface.
More decorations do not automatically create a better display.
Instead, think in layers.
The first layer might be close to the street.
The second could follow the walkway.
The final layer might be the porch or front door.
Each area should reveal something slightly different.
This structure creates visual depth and makes a modest number of decorations feel like a larger installation.
Empty space is also useful.
Dark areas allow illuminated decorations to stand out.
A single glowing lantern can look much more dramatic when surrounded by darkness than when placed among dozens of competing lights.
Choose One Clear Halloween Story
A strong theme makes decorating decisions easier.
If the theme is a haunted estate, focus on architectural elements such as gates, columns, urns, lanterns, and aged signs.
If the theme is haunted woodland, focus on branches, moss, ghosts, leaves, stones, and subtle lighting.
If you prefer a harvest Halloween style, focus on pumpkins, dried corn, grasses, lanterns, hay, and dark autumn flowers.
🎃 Mixing styles is possible, but every element should still support the same overall atmosphere.
Before adding any new decoration, ask whether it strengthens the story.
If it does not, the display might actually look stronger without it.
Focus on Lighting After Sunset
Halloween decorations are often viewed after dark, so lighting deserves as much attention as the physical props.
Start by identifying the primary focal point.
Illuminate that area more strongly.
Then use smaller lights to guide the viewer through the rest of the scene.
Uplighting is especially effective for branches, ghosts, tombstones, and architectural props.
Placing a light near the ground and aiming it upward creates dramatic shadows.
Backlighting can be even more mysterious.
A hidden light behind a ghost or branch arrangement creates a glowing silhouette without revealing the light source.
Warm white and amber lighting generally produces a traditional haunted look.
Cool white or subtle blue lighting can work well for moonlit woodland themes.
Avoid mixing too many lighting colors unless the display is intentionally playful.
Add Motion Carefully
Movement can make an outdoor display feel alive.
Loose fabric, lightweight hanging ghosts, small ribbons, dried grasses, and dangling decorations naturally react to wind.
This subtle motion often feels more convincing than motorized props.
Place moving objects where they have enough open space to shift safely without hitting visitors or nearby structures.
Branches and fabric should also be secured firmly enough to handle changing weather.
Small movement creates atmosphere.
Large uncontrolled movement can quickly make a display look messy.
Make the Front Door Part of the Scene
The front door should not feel disconnected from the rest of the yard.
Use a wreath, branch arrangement, aged sign, dark ribbon, lanterns, or pumpkins that repeat materials already used outside.
For example, if your yard uses bare branches and amber lights, bring a small version of that combination onto the porch.
If your outdoor urns feature black fabric, use the same fabric around a door wreath.
These repeated details visually connect the entire property.
The result feels more like one complete design.
Do Not Forget Daytime Appearance
Halloween decorating often focuses on nighttime lighting, but Pinterest-friendly outdoor displays should also look good during the day.
Natural textures become especially important in daylight.
Branches, bark, stone finishes, dried flowers, foliage, pumpkins, old wood, and fabric all provide visual interest before the lights turn on.
Painted surfaces should also be carefully finished.
Bright daylight can reveal shiny plastic and unfinished construction materials that may disappear at night.
Matte paint usually photographs better outdoors.
Weathering techniques can also help blend different materials together.
Final Styling Details That Make a Big Difference
Once the major decorations are finished, step back and view the entire property from the street.
This perspective often reveals problems that are difficult to notice while decorating up close.
Some objects may need to be moved closer together.
Others may need more height.
A lantern may need to shift slightly so it illuminates a branch.
Small adjustments can significantly improve the composition.
Take another look from the walkway.
This is the perspective guests will experience.
The decoration should reveal new details as visitors approach the house.
📸 If the display looks interesting from both the street and the front door, the overall composition is probably working well.
Which DIY Outdoor Halloween Decorations Should You Try First
For maximum drama, the Grand Haunted Estate Entrance is the strongest starting point. It creates an immediate focal point and can completely transform the appearance of a front yard with only a few oversized elements.
The Giant Weathered Stone Urns are ideal for anyone who wants Halloween décor that feels elegant rather than overly spooky. They work especially well around porches, traditional houses, gates, and front steps.
The Moonlit Haunted Woodland Path is perfect for yards with trees, garden beds, or natural landscaping. It is also one of the easiest themes to build gradually because many of the materials can come directly from the garden.
Ultimately, the best diy outdoor halloween decorations are not necessarily the most complicated projects. They are the ones that use scale, lighting, texture, repetition, and storytelling effectively.
A few oversized branches, handmade stone props, warm lanterns, and carefully positioned pumpkins can create far more impact than a lawn crowded with unrelated decorations.
Start with one strong concept, build the largest focal point first, and then add details only when they support the theme.
With thoughtful styling and inexpensive materials, an ordinary porch or yard can become a dramatic Halloween setting that feels atmospheric, creative, and surprisingly luxurious. 🎃
Related posts:
Top 3 Halloween Window Painting Ideas That Will Make Your House Look Unforgettable
Best 3 Office Halloween Decorations That Make Your Workplace Look Unforgettable
Top 3 Homemade Halloween Decorations That Make Your Home Look Expensive
Top 3 Halloween Door Decorations That Make Your Entrance Look Expensive and Unforgettable
Top 3 Dollar Tree Halloween DIY Ideas That Look Shockingly Expensive
Best 3 Halloween Porch Ideas Everyone Will Want to Copy This Fall

