
Halloween decorating does not have to mean spending a fortune on expensive seasonal pieces that stay in storage for most of the year. With a little imagination, a few basic supplies, and smart styling, dollar tree halloween diy projects can transform inexpensive finds into decorations that look surprisingly polished, creative, and even luxurious.
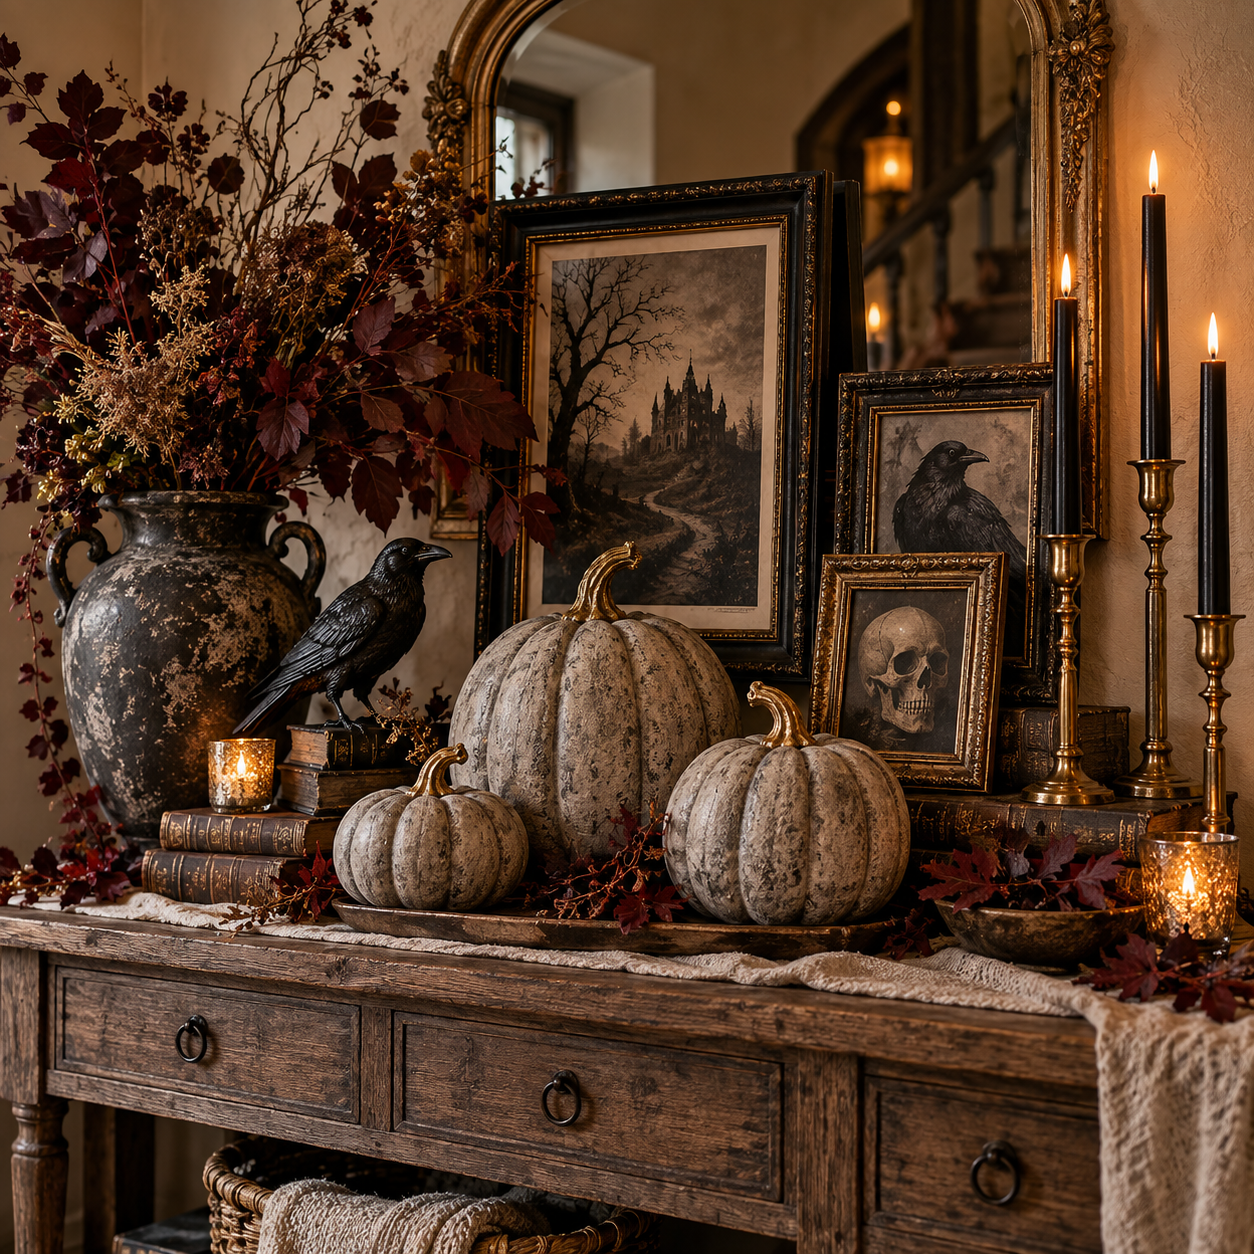
Dollar-store materials are especially useful for Halloween because many of the best decorations rely more on texture, color, atmosphere, and arrangement than on the original price of the item. Plastic pumpkins can become aged stone ornaments. Simple picture frames can turn into mysterious vintage artwork. Basic candle holders, glass jars, faux leaves, and inexpensive skeleton pieces can become part of dramatic displays that feel completely different once they are painted and layered together.
The secret is not buying everything Halloween-themed. Instead, look for ordinary objects that can be transformed. Neutral bowls, frames, trays, floral stems, glass containers, wood pieces, and craft supplies often provide a better foundation than decorations that already look finished.
For anyone trying to create beautiful Halloween décor on a tight budget, these Top 3 dollar tree halloween diy ideas offer some of the best combinations of affordability, visual impact, and customization. 🎃
They can work in entryways, living rooms, dining areas, front porches, shelves, mantels, and even small apartments where there is not enough space for large seasonal decorations.
Why Dollar Tree Halloween DIY Projects Are So Popular
One of the biggest advantages of making Halloween decorations yourself is control. Store-bought decorations usually come with a very specific style, but DIY pieces can be changed to suit almost any interior.
A bright orange plastic pumpkin, for example, does not have to remain bright orange. A coat of matte paint can transform it into something that resembles aged terracotta, limestone, antique metal, or black ceramic. The same idea applies to skulls, candle holders, frames, trays, and figurines.
This flexibility makes dollar tree halloween diy decorating especially attractive for people who prefer sophisticated Halloween interiors rather than colorful party decorations.
🕯️ Gothic interiors can use black, burgundy, brass, and dark wood.
🍂 Rustic Halloween decorating can focus on brown, cream, muted orange, and natural textures.
🤍 Minimalist Halloween interiors can rely on white pumpkins, charcoal accents, simple candles, and dried branches.
🌿 Cottage-style Halloween decorating can combine pumpkins, woven baskets, old books, dried flowers, and vintage-inspired artwork.
DIY decorating also encourages creativity because ordinary objects begin to look like potential supplies instead of finished products.
A simple plastic bowl could become a pedestal. A picture frame could become haunted artwork. Faux flowers could become a dark botanical arrangement. A small skeleton could become an elegant antique-inspired decoration when painted properly.
That transformation is what makes the process enjoyable.
What Makes a Dollar Tree Halloween DIY Look Expensive
The biggest difference between a decoration that looks inexpensive and one that looks intentionally designed is usually the finishing.
Color matters enormously.
Instead of using every traditional Halloween color at once, choose a limited palette. Black, cream, muted pumpkin orange, bronze, dark brown, dusty burgundy, and mossy green can instantly make inexpensive pieces feel more coordinated.
Texture is equally important.
Matte paint usually looks more convincing than shiny plastic. Light dry brushing can create the appearance of stone or aged metal. Layers of paint can imitate weathered surfaces that would otherwise cost considerably more in home décor stores.
Scale also makes a difference.
One small decoration sitting alone often feels insignificant. Grouping three pumpkins together, arranging several candles at different heights, or surrounding a focal object with branches and fabric gives the display more visual presence.
Lighting provides the final layer.
Warm battery-operated candles, lanterns, or subtle string lights can make even very inexpensive decorations feel atmospheric after sunset. ✨
The following comparison shows how the three featured projects differ.
| Dollar Tree Halloween DIY Idea | Difficulty | Best Location | Approximate Style | Main Materials |
|---|---|---|---|---|
| 🥇 Aged Stone Pumpkin Display | Easy | Entryway mantel porch | Elegant rustic gothic | Plastic pumpkins paint tray moss |
| 🥈 Haunted Vintage Frame Gallery | Easy to Medium | Hallway living room mantel | Victorian gothic mysterious | Frames printed art paint candle holders |
| 🥉 Dark Botanical Candle Centerpiece | Easy | Dining table console mantel | Moody elegant botanical | Faux branches flowers candles glass jars |
Each project can be adjusted depending on what is available locally, which means the exact materials do not need to match perfectly.
The design principle matters more than the individual object.
🥇 Top 1 Dollar Tree Halloween DIY Aged Stone Pumpkin Display
One of the easiest ways to make dollar-store Halloween decorations look expensive is to completely change their surface.
Plastic pumpkins are ideal for this technique because their shape is already recognizable and attractive. Their main weakness is usually their bright plastic finish.
Instead of displaying them directly from the store, turn them into sculptural pumpkins inspired by aged stone garden ornaments.
The finished arrangement can look especially beautiful on a console table, fireplace mantel, bookshelf, front porch, or entryway bench.


Materials for This Dollar Tree Halloween DIY
Start with several pumpkins in different sizes if possible.
Using multiple sizes creates a more natural composition than repeating identical objects. Small decorative pumpkins can be mixed with one larger pumpkin to establish a focal point.
Other useful materials include:
- Acrylic or chalk-style craft paint
- Black or dark brown paint
- Cream or warm gray paint
- Baking soda for added texture
- Inexpensive paintbrushes
- A shallow tray or wood board
- Faux moss
- Dried branches
- Battery-operated candles
The goal is not perfect painting.
In fact, slight variations in texture usually make the pumpkins look more realistic.
Create a Stone Like Base Coat
Begin by covering the original pumpkin color completely.
Warm gray, taupe, charcoal, off-white, and muted beige work particularly well.
Mixing a small amount of baking soda into acrylic paint can create a thicker surface with a subtle mineral texture. Once dry, the pumpkin may resemble plaster, concrete, or limestone instead of plastic.
Apply paint using a stippling motion rather than completely smooth brush strokes.
This creates small irregularities that imitate natural stone.
After the first layer dries, add another layer where necessary.
Avoid making every pumpkin identical. One can be pale limestone, another charcoal, and another warm taupe.
This variation gives the arrangement depth while keeping the overall palette coordinated.
Add Realistic Aging
Once the base color is dry, lightly apply darker paint around the pumpkin grooves.
Do not completely cover the surface.
Instead, allow the darker color to settle into recessed areas. This creates visual depth and makes the pumpkin shape more sculptural.
A second dry-brushed layer of cream or lighter gray can then be added to the raised portions.
The combination of shadow and highlight produces a weathered appearance similar to stone ornaments that have been outdoors for years.
For a slightly gothic effect, charcoal pumpkins can be brushed with tiny amounts of antique bronze or muted gray.
The metallic element should remain subtle.
Too much shine can make the original plastic quality noticeable again.
Style the Pumpkin Collection
Once the pumpkins are finished, styling becomes the most important step.
Place the largest pumpkin slightly off center rather than directly in the middle.
Add two or three smaller pumpkins around it.
Use a wood board, metal tray, basket, or shallow container underneath the grouping to visually connect the pieces.
A small amount of faux moss can soften the base.
Dried branches behind the pumpkins add vertical height, while warm candles create atmosphere.
For a modern Halloween arrangement, keep the styling restrained.
Three stone-look pumpkins with one black candle holder may be enough.
For a richer autumn display, surround the pumpkins with dried leaves, acorns, seed pods, or dark artificial foliage.
🎃 The result should feel like seasonal home décor first and Halloween decoration second.
That subtle approach is often what makes the arrangement look more expensive.
Important Note: If real candles are used, keep dried branches, faux moss, paper decorations, fabric, and painted plastic pumpkins well away from the flame. Battery-operated LED candles are usually the safer choice for layered DIY displays.
Make the Display Look Even More Luxurious
A useful trick is repeating materials already present in the room.
If the room contains brass hardware, introduce one small brass-colored candle holder.
If the furniture is natural wood, use a wood tray beneath the pumpkins.
If the interior contains black metal, include one black lantern or metal frame.
This creates continuity between the seasonal decoration and the permanent interior.
The display therefore feels intentional instead of temporary.
A few inexpensive objects can suddenly look like part of a professionally styled autumn home.
🥈 Top 2 Dollar Tree Halloween DIY Haunted Vintage Frame Gallery
Halloween wall décor often becomes overly theatrical because it relies heavily on obvious imagery.
A more sophisticated approach is creating a collection of mysterious vintage-inspired frames.
Dollar-store frames are perfect for this project because their original finish matters very little. They can easily be painted, distressed, layered, and arranged to resemble an antique gallery wall.
This project works particularly well in hallways, entryways, dining rooms, living rooms, and above fireplaces.
The final display can remain elegant while still creating a slightly unsettling Halloween atmosphere. 🕸️

Choose Frames With Different Shapes
Look for frames with different proportions.
Tall rectangular frames, small oval-looking styles, ornate plastic borders, and simple square frames can all work together.
The variety is important because real vintage gallery walls rarely contain perfectly matching frames.
Paint the frames using a limited palette such as:
- Matte black
- Dark walnut brown
- Antique gold
- Bronze
- Charcoal
- Aged cream
If the original frame has decorative details, use dry brushing to highlight them.
For example, paint the entire frame black and lightly brush antique gold over raised areas.
This makes inexpensive molded plastic details appear much more dimensional.
Create Mysterious Halloween Artwork
The images inside the frames determine the overall mood.
Instead of obvious cartoon Halloween graphics, choose imagery inspired by old portraits, botanical drawings, ravens, moths, antique architecture, moons, insects, dark florals, vintage anatomy sketches, or mysterious landscapes.
Black-and-white images often work best.
Sepia tones can create an aged appearance.
To make newly printed images feel older, slightly reduce their contrast or use cream-colored paper.
Another option is placing dark translucent paper or thin vellum over the image to soften it.
The goal is not necessarily horror.
The artwork should feel mysterious enough that visitors notice something unusual after looking more closely.
Arrange the Gallery Before Hanging
Before attaching anything to the wall, arrange the frames on the floor.
Begin with the largest frame.
Then position smaller frames around it.
Avoid perfect symmetry unless the rest of the room has a very formal style.
A slightly irregular arrangement usually creates more character.
Leave relatively consistent spaces between frames so the gallery still feels organized.
Another option is leaning frames instead of hanging them.
Several frames can be layered against the wall on a mantel or console table.
This approach is especially useful for renters or anyone who does not want additional holes in the wall.
Add Candlelight and Small Decorative Details
Lighting makes this project dramatically more effective.
Place tall battery-operated taper candles beside the frame arrangement.
Black candle holders create a traditional gothic feeling, while antique brass holders produce a warmer Victorian look.
Small details can be added around the base.
Consider a miniature skull painted matte stone gray, a small ceramic pumpkin, an old-looking book, a dark glass bottle, or dried flowers.
The key is restraint.
Not every surface needs a spiderweb, skull, pumpkin, bat, and ghost.
Choose two or three repeating motifs instead.
For example, combine antique portraits, black candles, and dried roses.
The limited theme creates stronger visual identity.
Try a Haunted Portrait Transformation
Another variation involves transforming ordinary portrait images into subtle Halloween artwork.
A normal vintage portrait can be modified with tiny details such as darker eyes, a faint shadow, unusual botanical elements, or a small raven positioned nearby.
The change should remain subtle enough that it takes a moment to notice.
This creates a much more interesting visual effect than extremely obvious Halloween graphics.
From across the room, the wall looks sophisticated.
Up close, the mysterious details become visible.
That element of discovery makes the project especially memorable.
Use the Frames Beyond Halloween
One advantage of this project is that the frames can remain useful after Halloween.
Simply replace the artwork.
Matte black or antique brass frames work beautifully with autumn landscapes, Christmas illustrations, family photographs, botanical prints, or winter artwork.
This makes the project more sustainable than decorations that can only be displayed for a few weeks.
The same inexpensive frames can evolve throughout the year.
🥉 Top 3 Dollar Tree Halloween DIY Dark Botanical Candle Centerpiece
Not every Halloween decoration needs pumpkins or skeletons.
A dark botanical centerpiece can create a powerful seasonal atmosphere using branches, artificial flowers, glass containers, and candles.
This type of dollar tree halloween diy is particularly effective because it combines inexpensive materials in a way that resembles professional event styling.
The arrangement can become the centerpiece of a dining table, kitchen island, fireplace mantel, sideboard, or console table.
It also transitions easily from early fall into Halloween.

Begin With a Strong Container
The container establishes the entire arrangement.
Simple glass jars, ceramic-looking containers, black bowls, or inexpensive vases can all work.
If the original container looks too basic, paint it.
A matte black vase immediately creates drama.
Warm gray paint can produce a stone-like appearance.
Cream paint offers a softer neutral style.
For a slightly aged finish, apply one color as the base and lightly sponge another tone over the surface.
An inexpensive glass jar can also remain transparent.
Fill it with dark stones, artificial moss, or small branches to create visual interest at the bottom.
Build the Arrangement With Branches First
Branches should create the basic structure.
Use taller branches in the center or slightly toward the back.
Allow some stems to extend outward.
Avoid making the arrangement perfectly round.
Natural asymmetry creates a more realistic botanical appearance.
Dark brown branches work beautifully for rustic interiors.
Black-painted branches provide stronger Halloween drama.
Muted olive or burgundy foliage can soften the composition.
If using artificial stems, bend them slightly so they do not look completely straight.
Real plants rarely grow in perfectly uniform directions.
Small imperfections make artificial arrangements more convincing.
Add Dark Florals Carefully
Flowers can make Halloween décor unexpectedly elegant.
Deep burgundy roses, dark purple hydrangeas, muted rust flowers, black artificial leaves, dried seed heads, and smoky eucalyptus tones work particularly well.
Use flowers sparingly.
The branches should remain visible.
If the arrangement becomes too dense, it may look like a normal bouquet rather than seasonal botanical décor.
For a romantic gothic style, use burgundy flowers with black leaves.
For a rustic Halloween look, choose brown branches, dried grasses, and muted orange flowers.
For modern interiors, stick primarily to black branches with a few beige or taupe dried stems.
🖤 The color palette should complement the room rather than compete with it.
Surround the Arrangement With Candlelight
Place candle holders at different heights around the vase.
Three heights usually create a balanced composition.
For example, use one tall taper candle, one medium pillar candle, and one short votive.
Keep the colors consistent.
Black candles create drama.
Cream candles soften the scene.
Deep burgundy candles add warmth.
A combination of black holders and cream candles is particularly versatile because the contrast looks sophisticated without becoming too dark.
Warm candlelight also emphasizes shadows created by the branches.
At night, those shadows become part of the decoration.
Add One Unexpected Halloween Detail
The most successful centerpiece usually includes one clearly recognizable Halloween element.
It could be a tiny skull, a black raven, a miniature pumpkin, a spider, or a small skeletal hand.
However, choose only one strong motif.
For example, place a single matte-black raven beside the vase.
The arrangement suddenly becomes Halloween-specific without needing additional decorations.
Another option is placing one stone-look skull among cream candles and dried botanicals.
The contrast between elegant flowers and slightly eerie imagery creates visual tension.
That balance is ideal for adult Halloween decorating.
How to Make Dollar Tree Halloween DIY Decorations Look Cohesive
When several DIY decorations are displayed in the same room, consistency matters more than quantity.
Choose a small color palette before beginning.
A good sophisticated Halloween palette might include:
🖤 Matte black
🤎 Dark brown
🎃 Muted pumpkin orange
🤍 Cream
🍷 Burgundy
✨ Antique brass
Once the palette is established, repeat those colors throughout the room.
For example, black frames in the gallery can visually connect with black candle holders on the dining table.
Stone-look pumpkins can repeat the gray tones of the centerpiece vase.
Brass accents can appear in both candle holders and decorative trays.
These repeated elements create continuity.
The décor begins to feel like one collection rather than unrelated craft projects.
Best Places to Display Dollar Tree Halloween DIY Decor
Entryways are excellent for seasonal decorating because they create the first impression of the home.
A small console table can hold stone pumpkins, candles, and branches without requiring much space.
Living rooms offer more possibilities.
Mantels can support frame collections, candle displays, and botanical arrangements.
Coffee tables can hold a simplified version of the pumpkin display.
Bookshelves can incorporate small Halloween objects between existing books and decorative pieces.
Dining rooms are ideal for botanical centerpieces.
Instead of covering the entire table, keep the arrangement concentrated in the center so the table remains practical.
Front porches can use larger versions of the pumpkin project.
Group several painted pumpkins near the door with lanterns and seasonal foliage.
Even a very small apartment can participate in Halloween decorating.
One dramatic arrangement often creates more impact than many small decorations scattered everywhere.
Dollar Tree Halloween DIY Color Schemes Worth Trying
Traditional orange and black remains popular, but alternative palettes can create a more distinctive look.
Black Cream and Brass
This palette is perfect for sophisticated interiors.
Use black candle holders, cream pumpkins, brass trays, and dark branches.
The result feels elegant and timeless.
Burgundy Black and Dark Wood
This combination creates a romantic gothic atmosphere.
Burgundy flowers, black frames, dark wood furniture, and warm candlelight work beautifully together.
Stone Gray Moss and Brown
This palette is ideal for rustic Halloween decorating.
Stone-effect pumpkins can be paired with moss, branches, woven baskets, and weathered wood.
Cream Taupe and Muted Orange
This softer approach works well in neutral homes.
Use pale pumpkins, beige textiles, warm wood, and only small amounts of muted orange.
The room still feels seasonal without becoming dominated by Halloween colors.
Common Dollar Tree Halloween DIY Mistakes to Avoid
Buying too many different decorations is one of the most common mistakes.
Because dollar-store items are inexpensive, it becomes easy to fill a basket with unrelated objects.
However, ten random decorations often create less impact than three carefully styled projects.
Another common issue is leaving highly reflective plastic surfaces untouched.
Even a simple coat of matte paint can improve the appearance dramatically.
Scale is another consideration.
Very small decorations should usually be grouped together.
One tiny pumpkin sitting alone may look insignificant, but five small pumpkins arranged on a tray can create a complete visual moment.
Finally, avoid overcrowding every surface.
Negative space makes decorative objects easier to appreciate.
It also creates the impression of more deliberate styling.
How to Shop Smarter for Dollar Tree Halloween DIY Supplies
Instead of shopping only in the seasonal Halloween aisle, explore the entire store.
The craft section often contains paint, wood pieces, ribbon, foam, glue, floral wire, and brushes.
The floral section can provide branches, leaves, artificial flowers, and moss.
Kitchen aisles may contain glass jars, trays, bowls, and containers that can become decorative bases.
Picture frames can become gothic artwork.
Candle holders can become haunted table decorations.
Storage containers can even become structural pieces for larger crafts.
The best DIY shoppers look at shape rather than color.
Ask whether the object’s basic form is useful.
Paint, texture, fabric, and decorative layers can change almost everything else.
Final Thoughts on the Best Dollar Tree Halloween DIY Ideas
Beautiful Halloween décor does not depend on expensive materials.
Creative transformation is far more important.
The 🥇 aged stone pumpkin display is the strongest choice for anyone who wants an easy project with dramatic visual improvement. Simple plastic pumpkins can become sculptural pieces that work in rustic, modern, farmhouse, or gothic interiors.
The 🥈 haunted vintage frame gallery is perfect for adding personality to walls, fireplaces, and console tables. Because the frames can be reused throughout the year, this project also offers excellent long-term value.
The 🥉 dark botanical candle centerpiece provides one of the most elegant ways to introduce Halloween atmosphere without relying heavily on traditional decorations. Branches, deep florals, candles, and one mysterious accent can completely transform a dining table or living room.
Ultimately, the best dollar tree halloween diy projects rely on three principles: transformation, coordination, and restraint.
Transform inexpensive materials with paint and texture.
Coordinate colors and materials throughout the room.
And resist the temptation to use every Halloween symbol at once.
With those ideas in mind, even the simplest dollar-store supplies can become Halloween decorations that look creative, atmospheric, and surprisingly expensive. 🎃🕯️🖤
Related posts:

Top 3 Cardboard Halloween Decorations DIY Ideas That Look Shockingly Expensive
Top 3 Halloween Window Painting Ideas That Will Make Your House Look Unforgettable

Top 3 DIY Outdoor Halloween Decorations That Will Make Your Yard Look Unbelievably Expensive
Best 3 Office Halloween Decorations That Make Your Workplace Look Unforgettable

