
🍂 Gingham Painted Pumpkin Ideas are a beautiful way to transform ordinary pumpkins into charming autumn decorations that feel cozy, carefully curated, and surprisingly expensive. With their recognizable checkered patterns, soft seasonal colors, and timeless farmhouse appeal, gingham-painted pumpkins can bring a delightful combination of rustic warmth and refined elegance to almost any room.
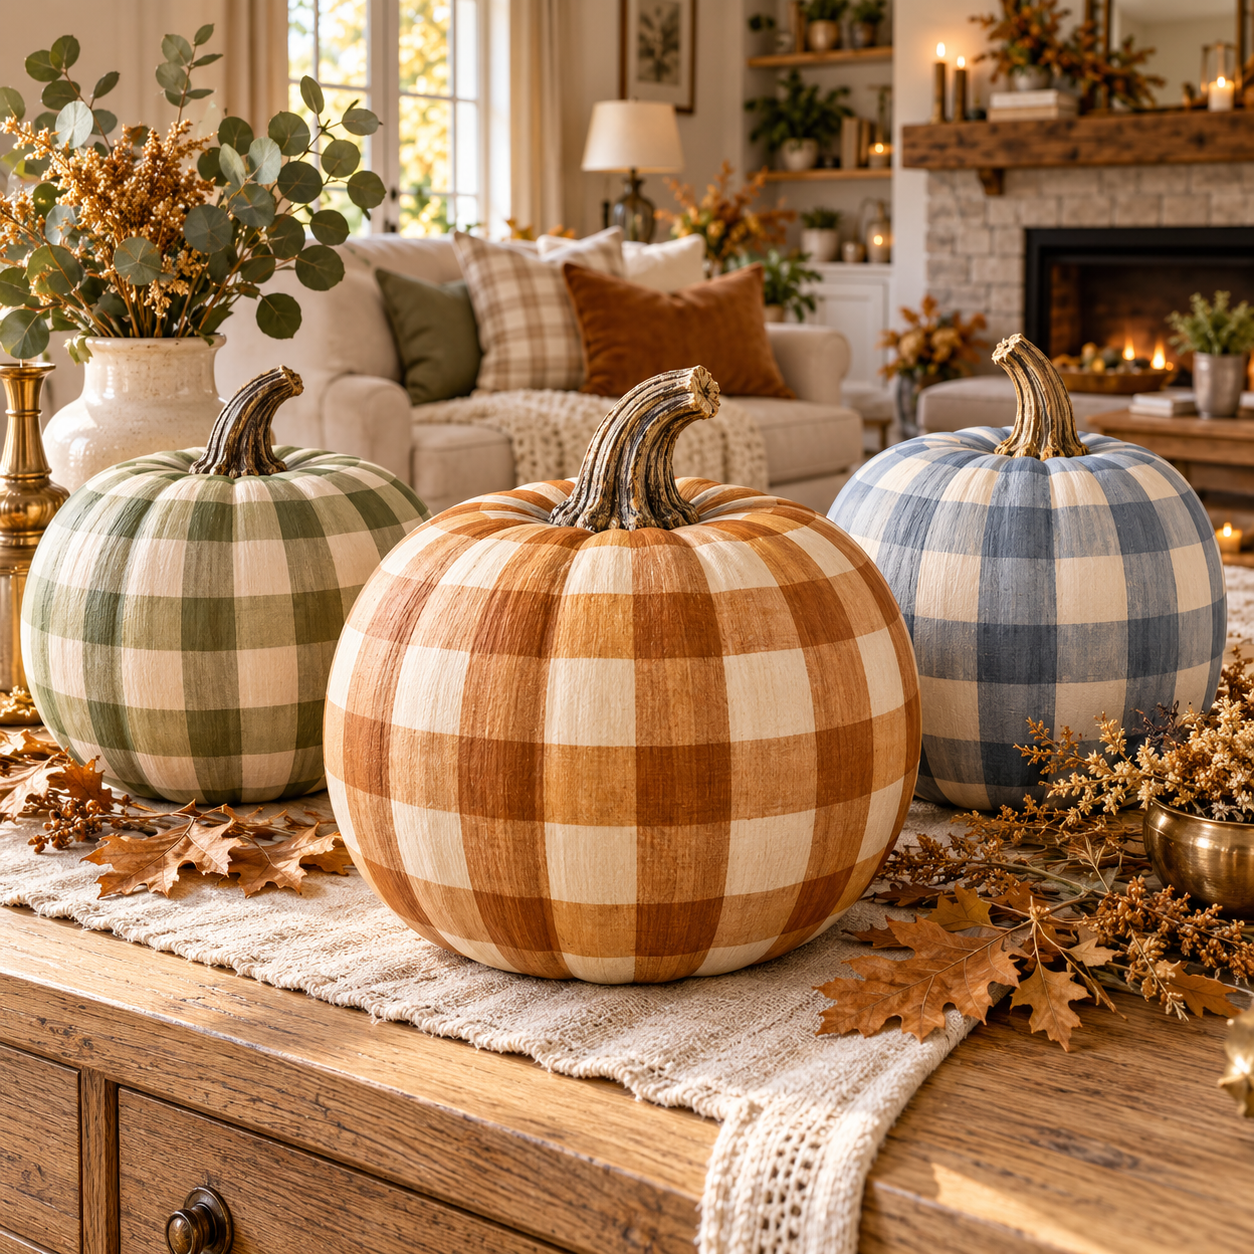
While traditional fall decorations often rely on bright orange pumpkins, dried leaves, and familiar harvest colors, gingham offers an opportunity to create something more distinctive. The pattern introduces structure and personality without overwhelming the surrounding decor. Whether arranged on a wooden entryway console, displayed in a cozy living room, or incorporated into an elegant Thanksgiving centerpiece, these painted pumpkins can become beautiful seasonal accents.
The secret lies in choosing the right color combinations, creating well-balanced checks, and matching the finished pumpkins with complementary decorative materials. A carefully painted gingham pumpkin can look remarkably sophisticated, especially when paired with natural linen, antique brass, weathered wood, or simple ceramic accessories.
These three creative approaches explore different interpretations of gingham, from calming sage green farmhouse charm to rich caramel autumn warmth and romantic dusty blue cottage elegance.
Each design offers a different decorating experience while retaining the timeless beauty of the classic gingham pattern.
🍂 Why Gingham Painted Pumpkin Ideas Are Perfect for Elegant Fall Decorating
Gingham is a traditional checked pattern formed by intersecting horizontal and vertical stripes. It is commonly associated with farmhouse textiles, picnic linens, cottage interiors, and relaxed country living.
When translated into pumpkin painting, the familiar pattern takes on an entirely new personality.
Instead of applying checks to a flat piece of fabric, the design follows the rounded surface of a pumpkin. The natural curves create subtle changes in the pattern, making the finished decoration feel handcrafted and full of character.
The combination is particularly appealing because gingham introduces visual interest without requiring complicated illustrations or elaborate artistic skills.
A few carefully chosen paint colors, a small brush, and a steady hand can produce an eye-catching result.
Why Gingham Patterns Look So Beautiful on Pumpkins
One of the biggest advantages of gingham is its flexibility.
The pattern can appear playful when painted in brighter colors, romantic when created with muted pastels, or luxurious when combined with sophisticated earthy shades.
Unlike decorative themes that rely on recognizable illustrations, gingham communicates its personality through repetition, proportion, and color.
This makes it particularly suitable for homes where seasonal decorations need to complement existing furniture and interior finishes.
For example, muted green gingham can coordinate beautifully with oak furniture and botanical arrangements. Warm caramel checks work naturally with woven baskets and autumn foliage, while dusty blue gingham introduces a refreshing contrast to traditional harvest colors.
Another appealing characteristic is the handmade appearance.
Slight variations in the painted lines can add personality, especially when the overall pattern remains consistent.
The goal is not necessarily to create a factory-perfect surface. Instead, the beauty comes from producing something carefully crafted, harmonious, and genuinely decorative.
🥇 Top 1 Gingham Painted Pumpkin Ideas With Sage Green Checks and Charming Farmhouse Details
Sage green gingham pumpkins are an excellent choice for anyone who loves the relaxed elegance of modern farmhouse interiors.
The color feels soft, natural, and understated, making it especially suitable for living rooms, kitchen shelves, fireplace mantels, and welcoming entryways.
Unlike bright seasonal decorations that compete for attention, sage green pumpkins blend gracefully into a neutral interior while adding a subtle autumn accent.
The defining feature of this design is a delicate sage green checkered pattern painted over a warm ivory pumpkin.
A combination of translucent stripes and deeper intersections creates the traditional gingham effect, while the pumpkin’s sculptural shape adds depth and dimension.


Creating a Sophisticated Sage Green Gingham Pattern
Begin with a medium-sized pumpkin that has a smooth surface and clearly defined vertical ribs.
A faux pumpkin made from lightweight craft material works well if the decoration will be stored and reused. A real pumpkin can also be used for a temporary seasonal display, provided its surface is clean and dry.
Paint the pumpkin with a soft ivory base color rather than stark white.
Warm ivory complements sage green beautifully and gives the finished decoration a softer, more expensive-looking appearance.
Once the base coat is fully dry, prepare two sage green paint mixtures.
The first should be a light, slightly diluted sage color. The second should be a deeper, more concentrated version of the same shade.
Using a fine flat brush, paint evenly spaced vertical stripes from near the stem toward the bottom.
Follow the natural contours of the pumpkin rather than attempting to make every line look perfectly straight from a single viewpoint.
Next, add horizontal stripes around the pumpkin, crossing the vertical bands at regular intervals.
Where the lines intersect, reinforce the color slightly to create darker squares.
This difference in opacity is what makes the design resemble woven gingham fabric rather than a simple checkerboard.
Work slowly and rotate the pumpkin frequently to maintain a consistent pattern.
Choosing the Perfect Color Balance
The most elegant sage green gingham pumpkins tend to use muted colors with slightly gray undertones.
An overly saturated green may look playful or artificial, while a softer botanical shade feels more timeless.
Consider combining warm ivory, muted sage, and a slightly deeper eucalyptus green.
The base color should remain visible between the checks, giving the pattern room to breathe.
For a refined finish, use matte acrylic paint rather than glossy paint.
A matte surface complements the softness of the gingham pattern and works particularly well with natural materials.
The stem can remain natural if it has an attractive texture. Alternatively, paint it a muted taupe or antique bronze to create a slightly more polished appearance.
Avoid excessively glittery finishes, as they may compete with the delicate pattern.
Styling Sage Green Gingham Pumpkins in a Farmhouse Interior
A sage green gingham pumpkin looks especially beautiful when displayed with complementary textures.
Place one medium pumpkin on a rustic wooden console and surround it with smaller ivory pumpkins, a folded linen napkin, and a simple ceramic vase.
A few dried olive branches or eucalyptus stems can reinforce the botanical color palette.
For a more layered arrangement, use pumpkins in several sizes.
Choose one prominent gingham pumpkin as the focal point, then position smaller plain pumpkins nearby.
This allows the checkered design to remain visually dominant without making the arrangement overly busy.
A woven tray can help organize the grouping and create an intentional decorative composition.
In a farmhouse kitchen, sage green gingham pumpkins can look charming beside wooden cutting boards, stoneware pitchers, and neutral tea towels.
On a fireplace mantel, combine them with antique candleholders and restrained autumn greenery.
The overall effect should feel relaxed rather than heavily decorated.
Why This Design Looks More Expensive Than It Is
The visual appeal comes from restraint.
Rather than incorporating numerous decorative elements, the design uses a recognizable pattern, a sophisticated color palette, and thoughtful styling.
The muted green coordinates naturally with warm wood, stone, linen, and other materials commonly associated with high-end farmhouse interiors.
A simple arrangement of three well-painted pumpkins can therefore create more visual impact than a crowded collection of inexpensive seasonal accessories.
✨ Best for: Modern farmhouse interiors, neutral living rooms, botanical autumn decor, and elegant kitchen displays.
🥈 Top 2 Gingham Painted Pumpkin Ideas With Warm Caramel Checks and Cozy Autumn Elegance
Caramel-colored gingham pumpkins introduce a richer and more traditional autumn atmosphere.
Their warm golden-brown tones evoke cinnamon, toasted sugar, autumn leaves, and cozy seasonal gatherings.
This design is particularly appealing for homeowners who prefer earthy colors but want something more distinctive than ordinary orange pumpkin decorations.
The combination of warm cream and caramel checks creates a sophisticated interpretation of classic harvest decor.
When styled with woven textures, antique metals, and natural wooden furniture, the finished pumpkins can feel wonderfully inviting.

Painting a Warm Caramel Gingham Pumpkin
Begin by choosing a pumpkin with a relatively smooth surface and an attractive rounded silhouette.
A pumpkin with gently defined ribs is ideal because the gingham pattern can wrap around the shape without becoming too distorted.
Apply a warm cream base coat and allow it to dry thoroughly.
Avoid bright white, which can create too much contrast with the caramel paint.
Next, mix a warm caramel shade using golden ochre, a small amount of burnt umber, and white paint.
The ideal result is a soft brown with a golden undertone rather than a dark chocolate color.
Prepare a lighter version for the initial stripes and a slightly darker mixture for the intersections.
Paint vertical bands around the pumpkin, leaving roughly equal spaces between them.
Then add horizontal bands, carefully following the curved surface.
At each intersection, apply another thin layer of caramel paint.
The overlapping sections should appear deeper than the individual stripes.
This produces a classic gingham effect with subtle tonal variation.
For a more authentic fabric-inspired appearance, keep the edges softly defined but reasonably consistent.
The finished design should look handmade and elegant rather than overly precise or digitally printed.
Adding Depth Without Overdecorating
Caramel gingham looks particularly sophisticated when combined with understated decorative details.
Consider painting the pumpkin stem a soft walnut brown or leaving its natural texture visible.
A small amount of antique gold wax on the raised areas of the stem can add dimension without distracting from the checks.
Another option is to create a gently aged appearance by brushing a very small amount of diluted taupe paint into the stem’s crevices.
Keep this effect concentrated on the stem instead of applying it over the entire gingham design.
This preserves the clarity of the pattern while introducing a touch of rustic character.
Avoid adding large ribbons, artificial flowers, or excessive embellishments.
The purpose of this design is to let the gingham pattern and warm color palette become the main attraction.
Creating a Cozy Autumn Table Centerpiece
A caramel gingham pumpkin can become the centerpiece of a beautiful fall dining table.
Start with a natural linen table runner in oatmeal or warm beige.
Place one large caramel gingham pumpkin slightly off-center and arrange two smaller pumpkins nearby.
To create a balanced arrangement, choose companion pumpkins in cream, taupe, or muted terracotta.
Add slender antique brass candleholders for height.
A few dried wheat stems or carefully placed oak leaves can provide additional seasonal texture.
The combination of caramel checks, natural fibers, and warm metallic accents creates an inviting atmosphere without feeling overly rustic.
For Thanksgiving gatherings, the same design can coordinate with cream dinnerware, amber drinking glasses, and natural woven placemats.
Keep the gingham pumpkin as the central decorative feature and repeat its caramel color sparingly throughout the setting.
Small touches, such as cinnamon-colored napkins or caramel-toned candles, can make the entire arrangement feel cohesive.
Decorating Entryways With Caramel Gingham Pumpkins
Entryways benefit from seasonal decorations that feel welcoming but remain easy to maintain.
A caramel gingham pumpkin placed on a wooden bench or entryway console can instantly introduce autumn warmth.
Pair it with a ceramic lamp, a small basket, and a framed botanical print.
For a slightly more dramatic arrangement, position the pumpkin beneath a large round mirror with a dark bronze or aged brass frame.
The repeated warm tones help create a unified decorative atmosphere.
A soft plaid throw placed over a nearby bench can reinforce the cozy autumn feeling.
However, choose a subtle textile pattern so that it complements rather than competes with the pumpkin’s gingham design.
The Secret to a Luxurious Caramel Color Palette
The most successful caramel gingham pumpkins use warm colors with enough contrast to make the checks visible.
If the caramel is too pale, the pattern may disappear against the cream background.
If it is too dark, the pumpkin can begin to resemble a bold checkerboard rather than delicate gingham.
A balanced combination of cream, honey caramel, and toasted brown usually creates an attractive result.
The darker shade should appear mainly where the stripes intersect.
This layered technique gives the pattern its characteristic woven appearance.
🍁 Best for: Thanksgiving centerpieces, cozy dining rooms, rustic entryways, and warm neutral fall decorating.
🥉 Top 3 Gingham Painted Pumpkin Ideas With Dusty Blue Checks and Vintage Cottage Style
Dusty blue gingham pumpkins offer a refreshing alternative to traditional fall color palettes.
While orange, rust, and brown dominate many autumn decorations, muted blue introduces a gentle sense of calm and romantic charm.
This approach is particularly effective in cottage-style homes, French country interiors, and bedrooms with soft vintage-inspired furnishings.
The combination of dusty blue checks and creamy ivory creates a delicate decorative piece that feels nostalgic yet sophisticated.
It is especially beautiful when paired with weathered wood, faded linen, antique silver, and understated porcelain accessories.

How to Paint Dusty Blue Gingham Pumpkins
Choose a small or medium pumpkin with a rounded shape and relatively smooth surface.
For this design, a slightly squat pumpkin can be especially attractive because its low silhouette complements vintage cottage arrangements.
Begin by applying a creamy white or soft parchment base coat.
Allow it to dry completely before adding the pattern.
Mix dusty blue acrylic paint using muted blue, a little gray, and white.
The resulting shade should feel gentle and slightly faded rather than bright or saturated.
Prepare a pale blue mixture for the initial stripes and a deeper slate-blue mixture for the intersections.
Paint vertical stripes at regular intervals, adjusting their direction to follow the pumpkin’s natural curves.
Then create horizontal stripes around the pumpkin.
Use a small detail brush to darken the overlapping sections.
Because dusty blue is naturally understated, make sure the darker intersections remain visible enough to establish the gingham pattern.
For a softer cottage appearance, use a fine brush with controlled strokes rather than heavy blocks of paint.
The pattern should remain consistent, but small handmade variations can enhance its charm.
Introducing Vintage Character Through Texture
Dusty blue gingham pumpkins pair beautifully with slightly weathered decorative finishes.
One simple technique involves gently softening selected edges with a clean, nearly dry brush before the paint completely sets.
This creates a subtle, fabric-inspired appearance without destroying the recognizable checks.
Another approach is to use an eggshell or matte protective finish after the design dries.
Avoid thick glossy coatings, which may make the pumpkin look less natural.
For the stem, consider a muted gray-brown finish.
A carefully painted stem with natural-looking shadows can complement the vintage atmosphere.
You can also leave the original stem untreated if its color works with the chosen palette.
The goal is to create a decorative object that looks as though it belongs in a charming country cottage rather than a brightly colored seasonal display.
Decorating a Cottage-Style Living Room
Dusty blue gingham pumpkins look beautiful on whitewashed wooden shelves, vintage sideboards, and narrow console tables.
Start with a small collection of pumpkins in different sizes.
Paint one or two with dusty blue gingham and leave the others in simple cream.
Add a few understated decorative objects, such as a weathered wooden candlestick or a small antique-inspired picture frame.
A linen-covered book or folded cotton textile can introduce additional softness.
To maintain a cohesive appearance, repeat the dusty blue color in one or two surrounding elements.
This might be a cushion, ceramic vase, or decorative throw.
Avoid introducing numerous competing patterns.
A delicate gingham pumpkin becomes most effective when the surrounding objects remain visually calm.
Creating a Romantic Autumn Window Display
A windowsill can be a wonderful location for a dusty blue gingham pumpkin arrangement.
Position a small painted pumpkin near a simple ceramic vessel filled with dried grasses.
Add a cream-colored pillar candle in a stable holder, keeping it safely separated from flammable materials.
Natural daylight will emphasize the gentle color variations in the checks.
During the evening, soft ambient lighting can make the display feel particularly cozy.
For a larger window, consider arranging three pumpkins at slightly different heights.
Use a low wooden riser to elevate one of them and create a more interesting composition.
Keep the supporting decorations minimal to ensure the gingham design remains visible.
Why Dusty Blue Works for Autumn Decorating
Although dusty blue is not a conventional harvest color, it combines beautifully with autumn neutrals.
Cream, warm taupe, aged wood, muted olive, and brushed silver all help connect the blue checks to a seasonal environment.
This makes dusty blue gingham pumpkins useful for interiors where traditional orange decorations would feel out of place.
The color is also versatile enough to complement existing blue-and-white home accessories.
However, the gingham pattern gives the pumpkins their own identity, distinct from painted porcelain-inspired ornaments or botanical illustrations.
💙 Best for: Romantic cottage interiors, French country decorating, neutral bedrooms, vintage sideboards, and elegant autumn window displays.
🎨 Gingham Painted Pumpkin Ideas Color Comparison
Choosing the right palette is one of the most important decisions when creating gingham-painted pumpkins.
Each of the three designs offers a different atmosphere and works best with specific decorative materials.
| Gingham Pumpkin Style | Main Colors | Decorating Mood | Best Display Location | Recommended Accessories |
|---|---|---|---|---|
| 🥇 Sage Green Gingham | Sage green and warm ivory | Calm modern farmhouse | Kitchen shelves and living room consoles | Linen, eucalyptus, oak wood |
| 🥈 Caramel Gingham | Golden caramel and cream | Cozy autumn elegance | Dining tables and entryways | Brass, wheat stems, woven baskets |
| 🥉 Dusty Blue Gingham | Dusty blue and parchment white | Romantic vintage cottage | Windowsills and sideboards | Weathered wood, antique silver, cotton textiles |
A balanced color palette is more important than using numerous decorative embellishments.
Keeping the design limited to two or three closely related shades helps the checks appear intentional and visually harmonious.
🖌️ Essential Supplies for Beautiful Gingham Painted Pumpkin Ideas
Creating elegant gingham-painted pumpkins does not require expensive equipment.
Most materials are easy to find in craft stores, and many can be reused for other seasonal projects.
The most important supplies are a suitable pumpkin, high-quality acrylic paint, and brushes that allow controlled application.
Choosing the Right Pumpkins
Both real and artificial pumpkins can work for this project.
Real pumpkins have authentic shapes, stems, and natural surface variations.
They are ideal for short-term autumn displays but eventually deteriorate, particularly in warm or humid environments.
Artificial pumpkins are more practical for decorations intended to last for multiple seasons.
Lightweight craft pumpkins with relatively smooth surfaces are especially easy to paint.
Avoid heavily textured pumpkins if you want a precise and consistent gingham pattern.
Deep grooves and irregular ridges can make evenly spaced stripes more challenging.
Small pumpkins work beautifully in tabletop arrangements, while medium pumpkins are ideal for consoles and mantel displays.
For a coordinated collection, combine several sizes while keeping the same paint palette.
Recommended Painting Materials
Prepare the following supplies before beginning:
- 🎨 Matte acrylic paint in your chosen colors
- 🖌️ Small flat brushes for broad stripes
- ✨ Fine detail brushes for intersections and corrections
- 🎃 Real or artificial pumpkins with smooth surfaces
- 📏 Flexible measuring tape or washable guide marks
- 🧻 Soft cloths and a small water container
- 🛡️ Water-based protective sealer compatible with the paint and pumpkin material
- 📰 Protective paper for the working surface
Low-tack painter’s tape can help guide certain sections, particularly on smoother artificial pumpkins.
However, tape does not always adhere evenly to curved or deeply ribbed surfaces.
For many pumpkins, carefully painting the stripes freehand with light guide marks is easier.
If using a sealer, test it on a small hidden area first to ensure it does not smear the paint or alter the desired finish.
How to Master the Classic Gingham Painting Technique
The defining feature of gingham is the visual effect created by intersecting bands of color.
Understanding this simple principle makes it easier to create convincing painted versions.
A traditional gingham-inspired design typically includes a light background, medium-colored stripes, and darker overlapping intersections.
The contrast between these three areas is what distinguishes it from a simple plaid or checkerboard.
Step 1 Prepare the Pumpkin Surface
Clean the pumpkin thoroughly and allow it to dry.
For artificial pumpkins, remove dust, residue, and any surface contaminants that could interfere with paint adhesion.
Some smooth plastic surfaces benefit from a compatible craft primer.
For real pumpkins, avoid soaking the surface or using materials that could damage the skin.
Apply a thin, even base coat and allow it to cure according to the paint manufacturer’s recommendations.
A second coat may be necessary if the original pumpkin color remains visible.
Step 2 Plan the Stripe Spacing
Before painting, decide how large the gingham checks should be.
Small pumpkins generally look best with narrower stripes.
Larger pumpkins can accommodate wider checks without losing the recognizable pattern.
Use the pumpkin’s ribs as visual guides when appropriate.
Mark several reference points around the pumpkin using a removable method suitable for its surface.
Remember that a curved surface changes the apparent spacing when viewed from different angles.
Aim for a balanced visual rhythm rather than exact geometric perfection.
Step 3 Paint the Vertical Stripes
Using your lighter gingham color, paint vertical stripes around the pumpkin.
Keep the brush lightly loaded to reduce drips and uneven paint buildup.
Follow the pumpkin’s curved shape from near the stem toward the bottom.
Allow the stripes to dry before painting in the opposite direction.
This reduces the risk of accidental smearing and helps maintain clean overlapping sections.
Step 4 Add Horizontal Bands
Paint horizontal bands around the circumference of the pumpkin.
Work in manageable sections and rotate the pumpkin as needed.
Try to keep the horizontal stripes at reasonably consistent intervals.
A slightly flexible line is acceptable because the pumpkin’s natural surface is not perfectly flat.
Once the horizontal bands are complete, allow the paint to dry.
Step 5 Darken the Intersections
This is the step that transforms ordinary stripes into gingham.
Locate each area where a horizontal stripe crosses a vertical stripe.
Using a darker version of your chosen color, carefully reinforce the overlapping sections.
Maintain a similar shape and size across the pumpkin.
The intersections should appear visibly darker than the individual stripes without becoming completely unrelated squares.
For a softer effect, build the color gradually with thin layers.
Step 6 Finish the Pumpkin
After the paint has dried completely, inspect the pattern from several angles.
Correct any distracting gaps or uneven intersections using a small detail brush.
If desired, apply a compatible matte protective finish.
Allow all coatings to dry and cure before arranging the pumpkin with other decorations.
Important Note: When painting real pumpkins, use clean, undamaged pumpkins and suitable water-based craft products. Painted real pumpkins are intended for decoration only, not consumption. Keep them away from excessive moisture and direct heat, and discard them if they begin to soften or develop mold. For reusable artificial pumpkins, check paint and sealer compatibility before coating the entire surface.
🏡 How to Style Gingham Painted Pumpkin Ideas Without Making a Room Look Busy
A beautifully painted pumpkin deserves a thoughtful display.
Because gingham is a repeating pattern, surrounding it with too many competing patterns can weaken its visual effect.
The most attractive arrangements balance decorative detail with quiet background elements.
A gingham pumpkin can become the focal point while other accessories contribute complementary shapes, heights, and textures.
Combine Patterned and Plain Pumpkins
One of the easiest styling techniques is to pair gingham-painted pumpkins with solid-colored pumpkins.
For example, position one large sage green gingham pumpkin beside two smaller ivory pumpkins.
The plain pumpkins reinforce the color palette without creating additional visual competition.
This arrangement is particularly effective on narrow shelves or consoles where decorative space is limited.
For larger displays, use three to five pumpkins in varying sizes.
Keep the majority solid-colored and reserve the patterned finish for one or two focal pieces.
This creates rhythm and helps the gingham remain distinctive.
Use Natural Materials to Create Depth
Gingham complements natural materials beautifully.
Wooden trays, woven baskets, stoneware bowls, and linen runners can all provide attractive foundations for seasonal displays.
These materials contribute texture without adding strong graphic patterns.
For sage green pumpkins, choose pale oak and cream linen.
For caramel gingham, combine aged wood, warm brass, and natural woven fibers.
For dusty blue checks, use weathered wood, soft cotton, and understated vintage accessories.
Texture is especially important when the color palette is muted.
A mixture of smooth painted pumpkins, woven materials, and gently textured ceramics creates visual richness without requiring bright colors.
Create Height With Simple Decorative Objects
A grouping of pumpkins at identical heights can appear flat.
Introduce variation by placing one pumpkin on a low wooden riser, stacked books, or a sturdy decorative tray.
Choose a stable base that securely supports the pumpkin.
Tall candleholders, botanical stems, or a table lamp can also help establish vertical interest.
Keep the arrangement balanced rather than perfectly symmetrical.
An off-center focal pumpkin with smaller supporting objects often looks more natural and professionally styled.
Repeat Colors With Intention
A coherent seasonal display usually contains a limited number of repeated colors.
If the focal pumpkin features caramel gingham, repeat that shade in a napkin, candle, or small accessory.
For dusty blue gingham, a nearby blue ceramic object can create a subtle connection.
The repeated color should appear as a gentle accent rather than a dominant theme throughout the entire room.
This approach helps the seasonal decoration feel integrated with the existing interior.
🍁 Where to Display Gingham Painted Pumpkins Throughout the Home
Gingham-painted pumpkins are versatile enough to decorate several areas of the home.
The key is adjusting the pumpkin size, color palette, and supporting accessories to match the setting.
Living Room Coffee Tables
Small gingham pumpkins can become attractive accents on a coffee table.
Arrange one painted pumpkin on a wooden tray with a small decorative bowl and a simple stack of books.
Avoid overcrowding the table, especially if it is used regularly.
A single well-painted pumpkin can provide enough seasonal personality without requiring an elaborate arrangement.
Fireplace Mantels
A fireplace mantel offers a natural platform for a coordinated pumpkin display.
Place a medium gingham pumpkin near one end and balance it with understated objects of varying heights.
Use plain pumpkins or neutral candleholders to distribute visual weight across the mantel.
Keep all seasonal decorations at safe distances from heat sources, flames, and fireplace openings.
Kitchen Open Shelving
Open shelving works beautifully with smaller gingham pumpkins.
Position one beside stacked ceramic bowls, a wooden cutting board, or a neutral stoneware pitcher.
The pumpkin adds seasonal charm without interfering with the practical purpose of the kitchen.
Sage green is particularly attractive in this setting because it coordinates naturally with wood and botanical accents.
Thanksgiving Dining Tables
Caramel gingham pumpkins can create a welcoming Thanksgiving table arrangement.
Use one prominent pumpkin with smaller companions, natural linen, and warm-toned accessories.
Keep the centerpiece low enough that guests can comfortably see and speak to one another across the table.
If using candles, choose secure holders and maintain adequate separation from dried botanical materials.
Entryway Consoles
An entryway console is an ideal location for a seasonal statement.
Choose one medium or large gingham pumpkin and place it beside an elegant lamp or framed mirror.
A small basket or folded textile can provide an additional layer of warmth.
The result feels welcoming without requiring excessive decorations.
Common Mistakes to Avoid When Painting Gingham Pumpkins
Even a relatively simple painting technique can become frustrating when small details are overlooked.
Fortunately, most common problems are easy to prevent.
Using Too Many Colors
A classic gingham design usually works best with one main color in different intensities against a lighter background.
Introducing several unrelated colors can make the pattern resemble decorative patchwork rather than gingham.
For a sophisticated result, begin with a restrained palette.
Additional colors can be introduced through nearby accessories instead of the painted checks.
Making Every Stripe Too Dark
When horizontal and vertical stripes are equally dark, the overlapping sections may become difficult to distinguish.
The finished pumpkin can then resemble a basic grid or checkerboard.
Use lighter stripes and darker intersections to preserve the fabric-inspired appearance.
Ignoring the Pumpkin’s Curves
Pumpkins have rounded surfaces, ribs, and irregular shapes.
Attempting to paint the pattern exactly as it would appear on flat paper can create distorted spacing.
Adapt the stripe direction to the pumpkin’s contours.
Rotate the pumpkin regularly and assess the design from the angle where it will most often be displayed.
Applying Thick Paint Layers
Heavy paint can produce visible ridges, uneven coverage, and poorly defined intersections.
Use thin coats and build the color gradually.
Allow each layer to dry before adding another.
This is particularly important when creating muted gingham shades with translucent-looking stripes.
Overcrowding the Finished Display
A gingham-painted pumpkin already contains plenty of visual detail.
Combining it with numerous patterned ribbons, heavily decorated pumpkins, and colorful accessories can make the arrangement appear chaotic.
Choose a few complementary objects and allow empty space around the focal piece.
The result will often feel more elegant and intentional.
Frequently Asked Questions About Gingham Painted Pumpkin Ideas
Can Beginners Make Gingham Painted Pumpkins?
Yes. Gingham is suitable for beginners because the pattern relies on repeated stripes rather than complex illustrations.
A small flat brush and a simple two-color palette are sufficient for most designs.
Beginners may find it helpful to practice the pattern on paper before applying it to a curved pumpkin.
Starting with a smooth artificial pumpkin can also make the process easier.
What Is the Best Paint for Gingham Pumpkins?
Water-based acrylic craft paint is a practical option for many pumpkin-painting projects.
It is widely available, comes in numerous colors, and can be applied with small brushes.
For artificial pumpkins, select paint compatible with the surface material.
For real pumpkins, use an appropriate decorative craft product and avoid damaging the skin.
Matte finishes are particularly attractive for farmhouse and cottage-style designs.
Can You Paint Gingham on Small Pumpkins?
Absolutely.
Miniature gingham pumpkins can look charming in small bowls, shelf arrangements, or tabletop displays.
Use narrower stripes and a fine detail brush to maintain recognizable checks.
Avoid making the pattern overly intricate on very small surfaces.
A simplified gingham design with clear intersections often looks better than an excessively detailed version.
Are Gingham Pumpkins Only Suitable for Farmhouse Decor?
No. Although gingham is closely associated with farmhouse style, its appearance changes significantly depending on the color palette.
Sage green works with modern farmhouse interiors, caramel complements classic autumn decorating, and dusty blue suits romantic cottage-inspired rooms.
Other color combinations can create contemporary or playful interpretations.
The surrounding accessories also influence how the finished pumpkin is perceived.
How Do You Make Painted Pumpkins Look Expensive?
Focus on color harmony, consistent painting, and restrained styling.
Muted colors often produce a more sophisticated appearance than extremely saturated shades.
A clean gingham pattern with clearly defined intersections adds craftsmanship.
Display the finished pumpkin with natural materials such as linen, wood, stoneware, or understated metal accents.
Avoid relying on excessive glitter or decorative embellishments to create visual interest.
How Long Will Painted Gingham Pumpkins Last?
The lifespan depends on whether the pumpkin is real or artificial.
Real painted pumpkins remain temporary seasonal decorations and may deteriorate within days or weeks depending on freshness, temperature, humidity, and handling.
Artificial pumpkins can often be stored and reused for multiple autumn seasons when painted and maintained properly.
Keep reusable pumpkins clean, dry, and protected from heavy objects during storage.
🍂 Final Thoughts on Gingham Painted Pumpkin Ideas
The beauty of Gingham Painted Pumpkin Ideas lies in their ability to transform a familiar autumn decoration into something personal, refined, and visually memorable.
A gingham pumpkin does not need elaborate embellishments or expensive supplies to make an impression. Its charm comes from the combination of a timeless pattern, a harmonious color palette, and thoughtful placement within the home.
🥇 Sage Green Gingham Pumpkins bring natural calm and understated farmhouse elegance to neutral interiors.
🥈 Warm Caramel Gingham Pumpkins create a rich, welcoming atmosphere that feels perfect for cozy autumn evenings and Thanksgiving gatherings.
🥉 Dusty Blue Gingham Pumpkins introduce a softer, romantic personality that complements vintage cottage and French country decorating.
Each approach offers a distinct interpretation of fall style, making it easy to choose a design that matches the character of a room.
By using carefully layered paint, balanced checks, and complementary decorative materials, an ordinary pumpkin can become a charming seasonal accessory that looks thoughtfully designed rather than mass-produced.
Whether displayed on a welcoming entryway console, incorporated into a beautiful dining table centerpiece, or arranged on a cozy living room shelf, gingham-painted pumpkins offer a delightful way to celebrate autumn with creativity, warmth, and timeless style.
Related posts:


Top 3 Cardboard Halloween Decorations DIY Ideas That Look Shockingly Expensive

Top 3 Halloween Window Painting Ideas That Will Make Your House Look Unforgettable

Top 3 DIY Outdoor Halloween Decorations That Will Make Your Yard Look Unbelievably Expensive
Best 3 Office Halloween Decorations That Make Your Workplace Look Unforgettable

