
A plastic pumpkins makeover is one of the easiest ways to turn inexpensive seasonal decorations into stylish fall pieces that look far more expensive than they really are. Those bright orange plastic pumpkins from discount stores, craft aisles, old Halloween bins, or previous autumn displays may seem basic at first, but with the right finish, texture, and styling, they can become beautiful decorations for a porch, entryway, mantel, dining table, or cozy fall corner.
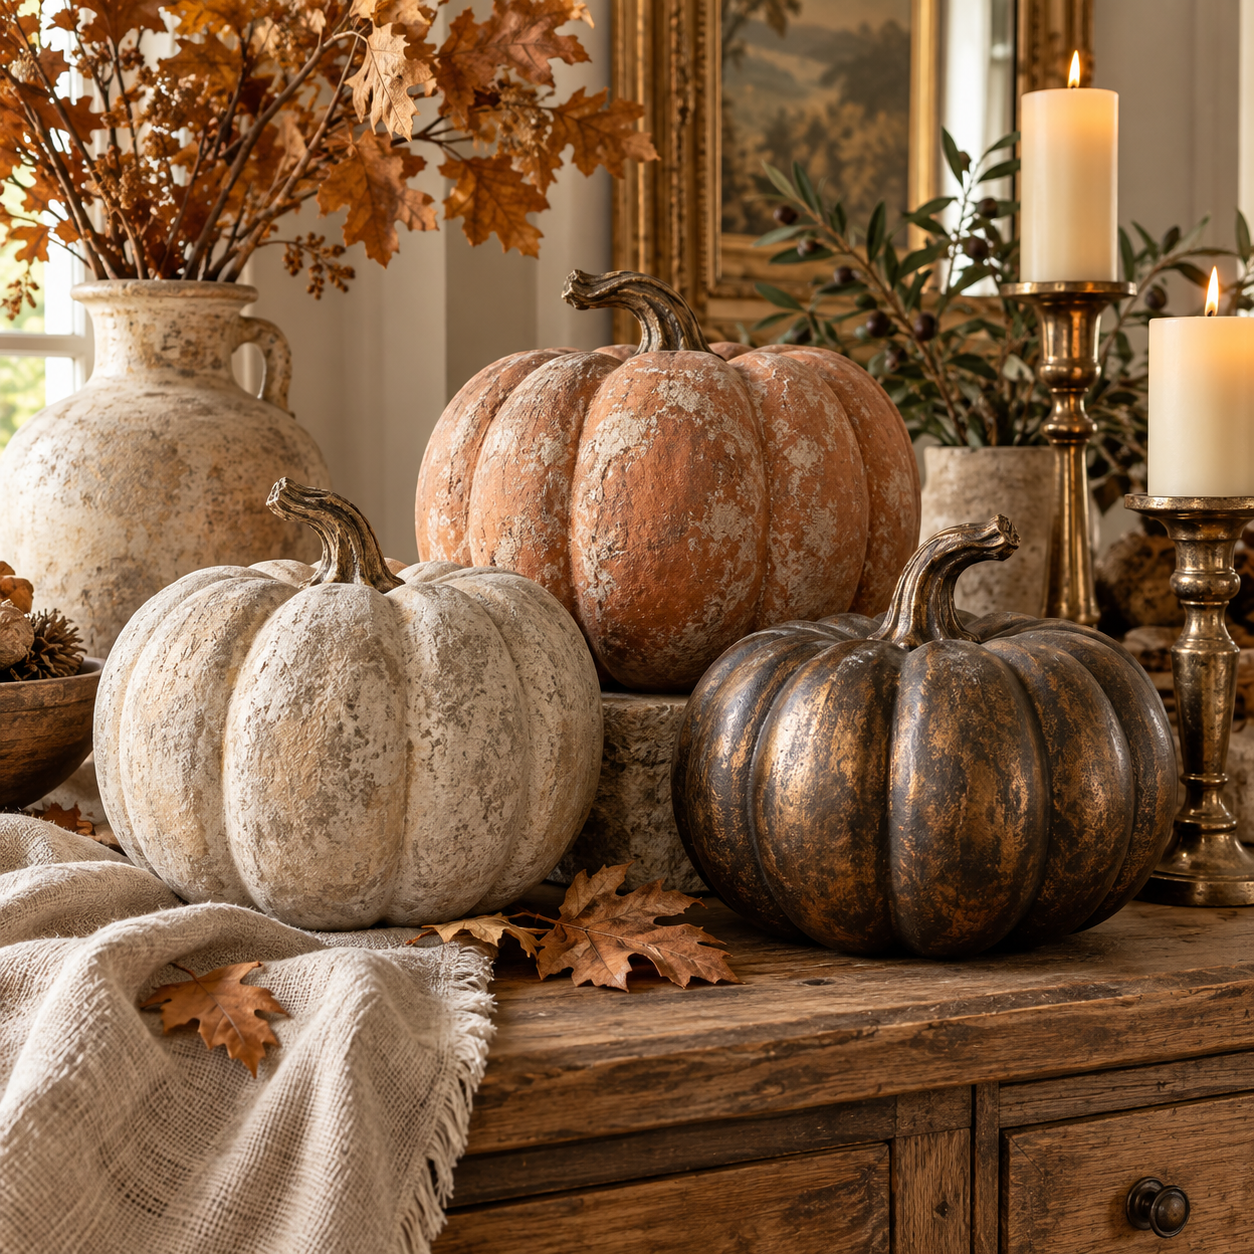
The biggest advantage is versatility. Plastic pumpkins are lightweight, reusable, weather-resistant in many cases, and available in countless sizes. Instead of buying new decorative pumpkins every year, a simple makeover can completely change their appearance and help them fit a different interior style.
🎃 A glossy orange pumpkin can become aged stone.
🍂 A cheap hollow pumpkin can look like hand-finished vintage pottery.
🌿 A bright Halloween decoration can be transformed into a soft neutral accent for an elegant autumn home.
The best makeovers do more than simply cover the original color. They create texture, depth, realistic aging, and a carefully chosen finish. Small details such as layered paint, darker creases, matte surfaces, natural-looking stems, subtle highlights, and coordinated surrounding decor are what make the final pumpkin feel intentional rather than crafty.
Below are three of the best plastic pumpkins makeover ideas for creating decorative fall pumpkins with distinctly different personalities. Each idea can be adapted to pumpkins you already own, and each one works beautifully for both small accent pieces and larger seasonal displays.
Why a Plastic Pumpkins Makeover Is Worth Trying
Plastic pumpkins are often designed for convenience rather than realism. Their surfaces may be overly smooth, their colors extremely saturated, and their molded stems noticeably artificial. That makes them excellent candidates for transformation.
A makeover allows the shape of the pumpkin to remain useful while removing the elements that make it look inexpensive. Once the glossy plastic finish disappears beneath paint and texture, the pumpkin begins to read more like ceramic, stone, plaster, aged metal, or handmade decor.
Another advantage is cost. A collection of premium decorative pumpkins can become expensive, especially when several sizes are needed to create a layered display. Repurposing inexpensive plastic versions makes it possible to build a more substantial arrangement without investing heavily in temporary seasonal pieces.
The process also creates opportunities to coordinate decorations with an existing home palette. Instead of being limited to traditional bright orange, pumpkins can be finished in:
- warm ivory
- mushroom taupe
- faded terracotta
- limestone beige
- charcoal brown
- olive gray
- antique bronze
- muted rust
These colors often blend more naturally into modern interiors, rustic spaces, farmhouse homes, cottage decor, minimalist rooms, and sophisticated front porch displays.
Choosing the Best Pumpkin for a Makeover
Not every plastic pumpkin needs to look realistic before the project begins. In fact, simple molded pumpkins often work exceptionally well because the new finish becomes the main visual feature.
Look for shapes with pronounced ridges, balanced proportions, and enough surface area for paint or texture to show clearly. A slightly irregular pumpkin is often more convincing than one that looks perfectly symmetrical.
Large pumpkins work especially well for entryways and porch displays, while medium pumpkins are ideal for mantels, consoles, shelves, and dining tables. Small pumpkins can be grouped together in bowls, baskets, trays, or layered centerpiece arrangements.
Before starting, remove dust, labels, stickers, and loose debris. Washing the pumpkin with mild soap and letting it dry completely helps paint and primer adhere more consistently.
Best Finishes for Different Decorating Styles
Different finishes create very different moods. Choosing the right transformation depends on where the pumpkin will be displayed and what kind of seasonal atmosphere is desired.
| Makeover Style | Best Colors | Final Look | Ideal Placement |
|---|---|---|---|
| Stone Effect | Limestone beige gray taupe | Aged sculptural and architectural | Porch entryway fireplace console |
| Vintage Terracotta | Burnt clay rust cream | Warm rustic and handmade | Dining table kitchen shelf covered porch |
| Antique Bronze | Deep brown black bronze | Dramatic moody and luxurious | Mantel dark entryway evening display |
All three styles can be created with inexpensive materials, but the layering technique matters more than the price of the supplies. A slightly uneven hand-finished surface usually looks more realistic than one perfectly flat layer of paint.
🥇 Best 1 Plastic Pumpkins Makeover With Aged Limestone Texture
One of the most elegant ways to transform a plastic pumpkin is to make it resemble an old limestone garden ornament. This approach works especially well for anyone who prefers refined fall decor instead of bright Halloween colors.
The finished pumpkin should feel sculptural, muted, and slightly weathered. Rather than looking freshly painted, it should resemble something that has spent several seasons in a European courtyard or old garden.
The beauty of this makeover comes from texture. Real limestone is not perfectly smooth. It contains subtle variations, small pits, dusty color changes, and natural imperfections. Recreating those details helps disguise the plastic underneath.


Building the Limestone Base
Start with a matte primer suitable for plastic. A primer layer is useful because it reduces the original shine and creates a more reliable surface for additional paint.
Once dry, apply a warm stone-colored base. Avoid pure white or cold gray. A combination of beige, greige, pale taupe, or soft mushroom tends to create a more convincing aged stone appearance.
The base coat does not need to be perfectly uniform. Slight variations can actually improve the final look.
For additional texture, a small amount of baking soda can be mixed into matte acrylic paint. This produces a chalky, mineral-like finish with enough grain to disguise the smoothness of molded plastic.
Apply the mixture using a stippling motion rather than long smooth brushstrokes. A sponge or stiff brush can also help create small irregular areas that resemble natural stone.
Adding Depth Into the Pumpkin Ridges
The grooves between pumpkin sections are important because they create shadow and make the shape more dimensional.
Use a slightly darker taupe or gray-brown wash and work it into the recessed lines. Remove excess paint from the raised areas before it dries completely.
The goal is not to create dramatic stripes. The darker color should simply suggest natural shadow and accumulated age.
Once that layer has dried, lightly dry-brush the highest ridges with a pale limestone or chalky ivory tone. This catches the raised texture and makes the surface feel worn and dimensional.
🎨 The combination of darker recesses and lighter highlights creates the illusion of real carved material.
Creating Realistic Weathering
Weathering is what separates a convincing limestone pumpkin from one that simply looks painted beige.
Small amounts of muted olive gray can be dabbed near the base or around the stem to mimic subtle outdoor aging. Very soft charcoal or brown washes can also be introduced into deeper creases.
Keep these additions restrained.
The effect should feel naturally accumulated rather than intentionally painted.
Important Note: When adding texture or multiple paint layers to plastic pumpkins, allow each coat to dry fully before applying the next one. Painting over a still-soft layer can pull away the finish and expose the slick plastic surface underneath.
Improving the Stem
A realistic stem can dramatically improve a plastic pumpkins makeover.
If the existing stem is highly glossy or obviously molded, repaint it in layered shades of brown, gray, and muted olive. Start with a dark base, then lightly brush a warmer brown over raised details.
Another option is replacing the plastic stem entirely with a short dried branch. A naturally twisted twig can make even a very inexpensive pumpkin feel handcrafted.
For a refined look, keep the stem relatively simple. Too many added ribbons or embellishments can compete with the stone effect.
Styling a Limestone Pumpkin Display
A large limestone-style pumpkin works beautifully beside an entryway door surrounded by smaller neutral pumpkins and dried grasses.
For an indoor arrangement, place two or three pumpkins at different heights on a console table with a ceramic lamp, textured linen, old books, and dried branches.
The color palette should remain quiet and natural.
Excellent companions include:
🌾 dried wheat
🌿 olive branches
🪵 weathered wood
🤍 cream ceramics
🪨 natural stone
🕯 antique brass candleholders
The final result feels less like Halloween decor and more like a seasonal architectural accent.
🥈 Best 2 Plastic Pumpkins Makeover With Vintage Terracotta Character
Terracotta is perfect for fall because its natural clay coloring already reflects the season. Warm rust, burnt orange, soft brown, dusty peach, and pale mineral deposits all echo autumn leaves without looking overly themed.
A terracotta plastic pumpkins makeover creates an especially charming result when the pumpkin is meant for a rustic kitchen, farmhouse entryway, cottage shelf, dining table, or covered porch.
Instead of trying to achieve flawless pottery, embrace imperfection. Vintage terracotta becomes more attractive as it ages, developing uneven color, chalky residue, scratches, stains, and weathered patches.

Creating the Clay Color
Begin with a matte terracotta base coat.
If a premixed terracotta color looks too bright, soften it with a little brown, beige, or cream. Real aged clay rarely appears as one intense orange tone.
For larger pumpkins, applying two slightly different clay colors can create a beautiful layered effect.
Use the darker color around the bottom, deeper ridges, and stem area. Apply a lighter dusty terracotta across the raised portions.
This helps the pumpkin appear naturally sun-faded.
Giving the Surface Handmade Texture
A terracotta pumpkin should not look glossy.
Mix a small amount of baking soda into matte paint to create a dry pottery-like surface. Another option is to stipple thick paint using a sponge.
Small inconsistencies are desirable. Tiny rough sections, visible brush texture, and subtle color shifts create the impression of handmade ceramic.
Avoid smoothing every mark.
Real terracotta has character precisely because it is imperfect.
Creating the Aged White Mineral Effect
One of the most recognizable features of old terracotta pots is a pale mineral deposit that forms on the surface.
This can be recreated using diluted cream or off-white paint.
Use a nearly dry sponge to dab the lighter color around the pumpkin in irregular patches. Concentrate some of the effect around the lower sections and within selected grooves.
Then soften the edges so they appear naturally worn.
The finish should remain subtle.
Too much bright white can make the pumpkin appear artificially distressed rather than genuinely aged.
Adding Rustic Patina
A thin brown wash can create dirt-like aging near the base and inside deep ridges.
Muted green-gray can also be added sparingly to suggest moss or outdoor exposure.
For a more cottage-inspired appearance, create slight chalkiness around the top of the pumpkin, similar to an old garden pot that has been exposed to rain.
This is an excellent project for combining several pumpkins that originally came from different stores. Once they receive a shared terracotta finish, their shapes suddenly feel like part of one intentional collection.
Choosing the Right Stem
Terracotta looks especially natural with a wooden stem.
Replace a plastic stem with a piece of dried vine, twig, or branch if possible. A curved or irregular piece adds organic character.
If replacement is not practical, repaint the existing stem in matte dark brown and lightly dry-brush it with gray or tan.
A small amount of jute can work for rustic styles, although it should be used sparingly to keep the pumpkin sophisticated.
Styling Vintage Terracotta Pumpkins
Group several clay-colored pumpkins with ceramic pots, dried herbs, baskets, linen napkins, and wooden boards.
In a kitchen, a small terracotta pumpkin can sit beside an herb pot or ceramic bowl.
On a dining table, arrange different sizes along a linen runner with small candles and branches.
On a covered porch, combine the pumpkins with real terracotta pots filled with ornamental grasses or autumn flowers.
The key is repetition.
Using several related earthy colors creates a layered seasonal look that feels more natural than relying on one intense orange.
🥉 Best 3 Plastic Pumpkins Makeover With Dark Antique Bronze Finish
For a moodier fall aesthetic, antique bronze offers a completely different direction.
This makeover turns lightweight plastic pumpkins into decorations that resemble old cast-metal objects. The finish can feel dramatic, historical, and surprisingly luxurious.
Antique bronze works especially well in interiors with darker furniture, black accents, antique frames, vintage mirrors, deep wood tones, or warm candlelight.
It is also an excellent choice for Halloween decor that still feels sophisticated.

Starting With a Dark Foundation
The base should be deep and matte.
Use charcoal brown, espresso, black-brown, or muted black paint to completely cover the original plastic surface.
A very dark foundation gives the metallic highlights something to contrast against later.
Do not begin with bright metallic paint across the entire pumpkin. Doing so often creates a shiny craft-store appearance.
Instead, think of bronze as a surface that has darkened and aged over time.
Layering Metallic Highlights
After the dark base has dried, use a small amount of bronze metallic paint.
Apply it using a dry-brush technique.
Remove most of the paint from the brush before touching the pumpkin, then lightly sweep across the raised ridges.
This leaves metallic color only on high points while keeping the recesses dark.
The contrast creates the illusion of old metal that has been polished naturally through handling or wear.
For more complexity, add a tiny amount of antique gold or copper to selected high points.
✨ Less metallic paint usually produces a more convincing result.
Creating Verdigris Without Overdoing It
Traditional aged bronze sometimes develops green-blue oxidation called verdigris.
This effect can be beautiful when used carefully.
Mix muted turquoise with a little gray and green, then dilute it significantly. Dab tiny amounts into selected creases, around the stem, or near the bottom.
Immediately soften the edges with a cloth or sponge.
The oxidation should appear accidental.
If large areas become bright turquoise, the pumpkin may look theatrical rather than aged.
For a warmer alternative, skip green oxidation and use rust-brown undertones instead.
Enhancing the Stem
Paint the stem in the same dark bronze palette so it visually belongs to the pumpkin.
Add slightly brighter metallic highlights to the stem edges.
A dark bronze stem paired with subtle copper accents can look especially effective under warm indoor lighting.
The completed pumpkin should resemble a decorative object discovered in an antique shop rather than a seasonal plastic accessory.
Styling Antique Bronze Pumpkins
Bronze pumpkins respond beautifully to candlelight.
Place them on a dark wood mantel with taper candles, aged brass objects, and dried burgundy foliage.
They also work well on black shelves or console tables surrounded by old books and vintage frames.
For an elegant Halloween display, combine bronze pumpkins with:
🕯 tall black candles
🍂 deep burgundy leaves
🖤 charcoal ceramics
🌿 dried eucalyptus
🪞 antiqued mirrors
✨ warm brass accents
This allows Halloween elements to feel atmospheric without becoming cartoonish.
How to Prepare Plastic Pumpkins Before Painting
Preparation may not be the most exciting part of a makeover, but it has a major impact on durability.
Plastic surfaces are often extremely smooth, and some contain mold-release residue or oils from handling. Paint applied directly onto these surfaces may scratch or peel.
Begin by washing the pumpkin with mild dish soap and warm water.
Dry it completely.
If the surface is extremely glossy, lightly scuff it with very fine sandpaper. The goal is not to reshape the pumpkin but simply to create a slightly more paint-friendly surface.
Remove dust after sanding.
Then apply a primer designed for plastic or difficult surfaces.
A thin, even primer layer is usually better than one very thick layer.
How to Make a Plastic Pumpkins Makeover Look More Expensive
The difference between an ordinary craft project and sophisticated seasonal decor often comes down to restraint.
Expensive-looking finishes rarely rely on one flat color.
They contain layers.
A stone pumpkin may contain beige, taupe, gray, cream, and muted green. A terracotta pumpkin may include rust, brown, chalky white, and dusty peach. A bronze pumpkin may combine black-brown, copper, gold, and traces of patina.
These subtle variations mimic real materials.
Use Matte Finishes More Often Than Glossy Ones
Glossy surfaces can instantly reveal plastic.
Unless a ceramic or glazed pottery appearance is intentional, matte finishes are generally easier to make look realistic.
Chalky, mineral, plaster-like, and stone finishes disguise molded surfaces especially well.
Do Not Paint Every Detail Perfectly
Perfectly even coverage can sometimes look less realistic.
Nature and aged materials contain variation.
Allowing darker paint to settle into grooves and lighter paint to catch raised edges creates depth.
Slight asymmetry can make the object feel handcrafted.
Improve the Stem
A cheap-looking stem can undermine an otherwise beautiful makeover.
Repainting it with multiple tones or replacing it with a real piece of wood is one of the easiest upgrades.
Style Pumpkins in Groups
A single transformed pumpkin can be beautiful, but a grouped arrangement often looks more intentional.
Use odd-numbered groupings such as three or five pieces.
Vary their height and size.
Place larger pumpkins toward the back and smaller ones toward the front.
Color Palettes for Sophisticated Fall Pumpkin Decor
Color is one of the easiest ways to make seasonal decor feel cohesive.
Instead of mixing every traditional autumn tone together, choose a limited palette.
A warm neutral arrangement might include ivory, taupe, limestone, and pale brown.
A rustic palette could use terracotta, walnut, muted olive, and cream.
A dramatic palette could combine antique bronze, charcoal, burgundy, and brass.
Repeating just three or four colors throughout a room helps seasonal decor blend naturally with the existing interior.
Plastic Pumpkins Makeover Ideas for a Front Porch
A porch offers more space to experiment with scale.
Large plastic pumpkins can be transformed into faux stone pieces and positioned near planters or steps.
Medium terracotta-style pumpkins can be clustered around baskets, lanterns, and dried grasses.
Dark bronze pumpkins work well for a more dramatic Halloween transition later in the season.
Layering heights is important.
Use crates, low stools, steps, baskets, and planters to elevate certain pumpkins.
This prevents the display from becoming one flat row.
Consider mixing transformed plastic pumpkins with real natural materials.
Branches, dried leaves, ornamental grass, straw, weathered wood, and real squash help bridge the difference between artificial objects and the surrounding outdoor environment.
Plastic Pumpkins Makeover Ideas for Indoor Fall Decor
Indoors, smaller details become more visible.
For that reason, choose the smoothest paint application and most convincing texture for pumpkins placed close to eye level.
On a mantel, use three pumpkins with different heights rather than filling the entire surface.
On a console table, place one large stone-effect pumpkin beside a lamp and add two smaller pieces nearby.
For a dining table, low terracotta pumpkins work particularly well because they do not block conversation.
A bookshelf can hold one small bronze pumpkin among books, pottery, and framed artwork.
Seasonal accents feel more sophisticated when integrated into existing decor rather than replacing everything around them.
Where to Display Your Finished Pumpkins
A completed makeover can be used in many more places than a traditional Halloween display.
Try placing transformed pumpkins:
- beside the front door
- on fireplace hearths
- on mantels
- on kitchen shelves
- inside open cabinets
- on console tables
- on dining tables
- on sideboards
- inside decorative baskets
- on covered porches
- among potted plants
- beside lanterns
- on stair landings
The most effective displays usually combine seasonal accents with everyday materials already present in the home.
Common Plastic Pumpkin Makeover Mistakes to Avoid
One common mistake is using paint that is too bright.
If the goal is a sophisticated finish, colors usually benefit from being slightly muted.
Another mistake is applying too much texture.
Stone and pottery may be rough, but large heavy clumps can make the pumpkin look artificially coated.
Build texture gradually.
Using metallic paint too generously can also weaken a bronze effect. Metallic color is usually most convincing when it highlights raised areas rather than covering everything.
Finally, avoid overcrowding the finished pumpkin with decorations.
Bows, signs, ribbons, glitter, artificial leaves, and embellishments can all work in certain styles, but combining too many at once distracts from the new finish.
Let the transformed material remain the hero.
How to Store Made Over Plastic Pumpkins
One major advantage of these projects is reusability.
Before storing pumpkins, make sure they are completely dry and clean.
Wrap delicate textured finishes in soft paper or lightweight cloth to reduce scratching.
Avoid sealing several painted pumpkins tightly together where painted surfaces may rub against each other.
Store them away from extreme heat whenever possible.
With careful storage, the same pumpkins can return for several autumn seasons.
They can also be repainted again later if decorating preferences change.
Which Plastic Pumpkins Makeover Idea Is Best
Each of the three ideas offers a different visual personality.
🥇 Aged limestone is the strongest choice for elegant, neutral, architectural decor.
It looks especially beautiful in modern homes, organic interiors, European-inspired spaces, and refined front porches.
🥈 Vintage terracotta is ideal for warm rustic spaces.
It suits cottage decor, farmhouse kitchens, Mediterranean-inspired homes, natural autumn tablescapes, and cozy covered porches.
🥉 Antique bronze is best for darker seasonal styling.
It creates a dramatic look for mantels, vintage interiors, Halloween displays, moody entryways, and candlelit rooms.
There is no need to choose only one finish.
Several different makeover styles can be used throughout the home as long as they share compatible colors and materials.
Final Thoughts on Creating a Beautiful Plastic Pumpkins Makeover
A plastic pumpkins makeover proves that inexpensive seasonal decor does not need to look inexpensive. With layered paint, realistic texture, muted colors, thoughtful aging, and better styling, an ordinary plastic pumpkin can become a surprisingly refined autumn decoration.
The aged limestone version offers sculptural elegance.
The vintage terracotta version brings warmth and rustic character.
The antique bronze version introduces depth, drama, and a luxurious seasonal mood.
The most successful transformations focus on believable materials rather than complicated embellishment.
🎃 Start with the pumpkin shape you already have.
🎨 Build several subtle layers instead of one flat coat.
🌿 Use natural colors and textures.
🪵 Improve the stem whenever possible.
✨ Finish by styling the pumpkin with simple materials that support its new appearance.
These three plastic pumpkins makeover ideas make it possible to reuse old fall decorations while creating something that looks completely new. Whether the goal is a quiet neutral porch, a cozy rustic dining table, or a dramatic Halloween mantel, a thoughtfully transformed plastic pumpkin can become one of the most distinctive decorations of the entire season.
Related posts:

Best 3 Bookshelf Wallpaper Ideas That Make Any Wall Look Expensive

Best 3 Wedding Photo Displays That Make Your Celebration Feel More Personal

Best 3 Minimalist Cozy Interiors Ideas That Make Simple Homes Feel Warm and Beautiful

Best 3 Cozy Reading Chairs That Make Any Corner Feel Like Your Favorite Escape
Best 3 Wainscoting and Beadboard Styles That Instantly Make Any Room Look More Expensive
Best 3 Thanksgiving Table Ideas That Will Make Your Holiday Dinner Look Unforgettable

